乌啦呀哈呀哈乌啦!

欢迎光临,这里是喵pass的个人博客,希望有能帮到你的地方

0%

Unity 2022.3 Camera Component


相机参数

Clear Flags(清除标记):

A camera in Unity holds info about the displayed object’s colors and depths.
In this case, depth info means the game world distance from the displayed object to the camera.

When a camera renders an image it can get rid of all or just some of the old image information and then displays the new image on top of what’s left.
Depending on what clear flags you select, the camera gets rid of different info.

  • The skybox clear flag means that when the camera renders a new frame, it clears everything from the old frame and it displays the new image on top of a skybox.
  • The solid color clear flag means that when the camera renders a new frame, it clears everything from the old frame and it displays the new image on top of a solid color.
  • The depth only clear flag means that when the camera renders a new frame, it clears only the depth information from the old frame and it keeps the color information on top of which displays the new frame. This means that the old frame can still show but it doesn’t have depth information, meaning the new objects to be displayed can’t be shown as intersected or obstructed by the old objects, because there’s no information about how far the old objects are(depth info was cleared). So the new objects will be on top of the old ones, mandatory.

Background(背景):

The color applied to the remaining screen after (1) all elements in view have been drawn and (2) there is no skybox.

Culling Mask(剔除遮罩):

Includes or omits layers of objects to be rendered by the Camera.

Projection(投射方式):

  • Perspective(透视): Camera will render objects with perspective intact.
    • Field of view: The Camera’s view angle, measured in degrees along the axis specified in the FOV Axis drop-down.
  • Orthographic(正交): Camera will render objects uniformly, with no sense of perspective. NOTE: Deferred rendering is not supported in Orthographic mode. Forward rendering is always used.
    • Size: The viewport(The user’s visible area of an app on their screen.) size of the Camera when set to Orthographic.

Clipping Planes(剪裁平面):

Distances from the camera to start and stop rendering.

  • Near(近点): The closest point relative to the camera that drawing will occur.
  • Far(远点): The furthest point relative to the camera that drawing will occur.

Normalized Viewport Rect(标准视图矩形):

Four values that indicate where on the screen this camera view will be drawn. Measured in Viewport Coordinates (values 0–1).

  • X: The beginning horizontal position that the camera view will be drawn.
  • Y: The beginning vertical position that the camera view will be drawn.
  • W: Width of the camera output on the screen.
  • H: Height of the camera output on the screen.
    It’s easy to create a two-player split screen effect using Normalized Viewport Rectangle. After you have created your two cameras, change both camera’s H values to be 0.5 then set player one’s Y value to 0.5, and player two’s Y value to 0. This will make player one’s camera display from halfway up the screen to the top, and player two’s camera start at the bottom and stop halfway up the screen.

Depth(相机深度):

The camera’s position in the draw order. Cameras with a larger value will be drawn on top of cameras with a smaller value.

Rendering Path(渲染路径):

Options for defining what rendering methods will be used by the camera.

  • Use Graphics Settings: This camera will use whichever Rendering Path is set in the Project Settings -> Player
  • Forward(快速渲染): 摄像机将所有游戏对象将按每种材质一个通道的方式来渲染。对于实时光影来说,Forward的消耗比Deferred更高,但是Forward更加适合用于半烘焙半实时的项目。Forward解决了一个Deferred没能解决的问题:Deferred不能让Mixed模式的Directional Light将动态阴影投射在一个经过烘焙了的静态物体上。
  • Deferred(延迟光照): 最大的特点是对于实时光影来说的性能消耗更低了,这个模式是最适合动态光影的。对于次时代PC或者主机游戏, 当然要选择这个。次时代游戏几乎不需要烘焙光照贴图了,全都使用实时阴影是很好的选择。通过阴影距离来控制性能消耗。而在Viking Village的场景中,由于整个场景全部使用了动态光源,Forward的Rendering方面的性能消耗要比Deferred高出一倍! 因此在完全使用动态光源的项目中千万不能使用Forward。
  • Vertex Lit(顶点光照): All objects rendered by this camera will be rendered as Vertex-Lit objects.

Rendering path is the technique that a render pipeline uses to render graphics. Choosing a different rendering path affects how lighting and shading are calculated. Some rendering paths are more suited to different platforms and hardware than others.

  • Forward vs Deferred Rendering

Forward rendering does all of the work for rendering geometry up front when it gets submitted to the rendering pipeline. You submit your geometry and materials to the pipeline, and at some point the fragments(pixels) that represent your geometry are calculated and invokes a fragment shader to figure out the final “color” of the fragment based on where it is located on the screen (render target). This is implemented as logic in a pixel shader that does the expensive lighting and special effects calculations on a per-pixel basis.

The inefficiency with this approach is, when pixels get overwritten by geometry submitted later in the pipeline that appear in front of it. You did all of that expensive work for nothing. Enter deferred rendering:

Deferred rendering should really be called deferred shading because the geometry is (or can be) submitted to the pipeline very much in the same way as forward rendering. The difference is that the result is not actually a final color value for the final image. The pipeline is configured in a way such that instead of actually going through with the calculations, all of the information is stored in a G-buffer to do the calculations later. That way, this information can be overwritten multiple times, without ever having calculated the final color value until the last fragment’s information is written. At the very end, the entire G-buffer is processed and all of the information it stored is used to calculate the final color value.

Last words:

Neither technique is really harder to learn. We’re just coming from a forward rendering past. Once you have a good grasp of deferred rendering (and perhaps have a solid computer graphics background), you realize it’s just another way to do things.

It’s hard to say which technique is better. As pixel/fragment shaders get more GPU processing expensive, deferred shading becomes more effective. If early Z testing (https://docs.unity3d.com/6000.0/Documentation/Manual/SL-ZTest.html) can be employed or other effective culling techniques are used, deferred shading becomes less important. G-buffers also take up a lot of graphics memory.

Target Texture(目标纹理):

相机渲染不再显示在屏幕上,而是映射到纹理上。一般用于制作导航图或者画中画等效果。

Reference to a Render Texture that will contain the output of the Camera view. Setting this reference will disable this Camera’s capability to render to the screen.
Render Texture is a special type of Texture that is created and updated at runtime. To use them, first create a new Render Texture and designate one of your Cameras to render into it. Then you can use the Render Texture in a Material just like a regular Texture.

Occlusion Culling(遮挡剔除):

Occlusion culling is a process which prevents Unity from performing rendering calculations for GameObjects that are completely hidden from view (occluded) by other GameObjects, for example if they are behind walls. (https://docs.unity.cn/Manual/OcclusionCulling.html)

Allow HDR(渲染高动态色彩画面):

Enables High Dynamic Range rendering for this camera.

Allow MSAA(硬件抗锯齿):

Enables multi sample antialiasing for this camera.

Allow Dynamic Resolution(动态分辨率渲染):

Enables Dynamic Resolution rendering for this camera.

Target Display(目标显示器):

A camera has up to 8 target display settings. The camera can be controlled to render to one of up to 8 monitors. This is supported only on PC, Mac and Linux. In Game View the chosen display in the Camera Inspector will be shown.


Credits

Unity documentation: https://docs.unity.cn/Manual/class-Camera.html
Unity 摄像机参数介绍:https://blog.csdn.net/Scopperil/article/details/80440448


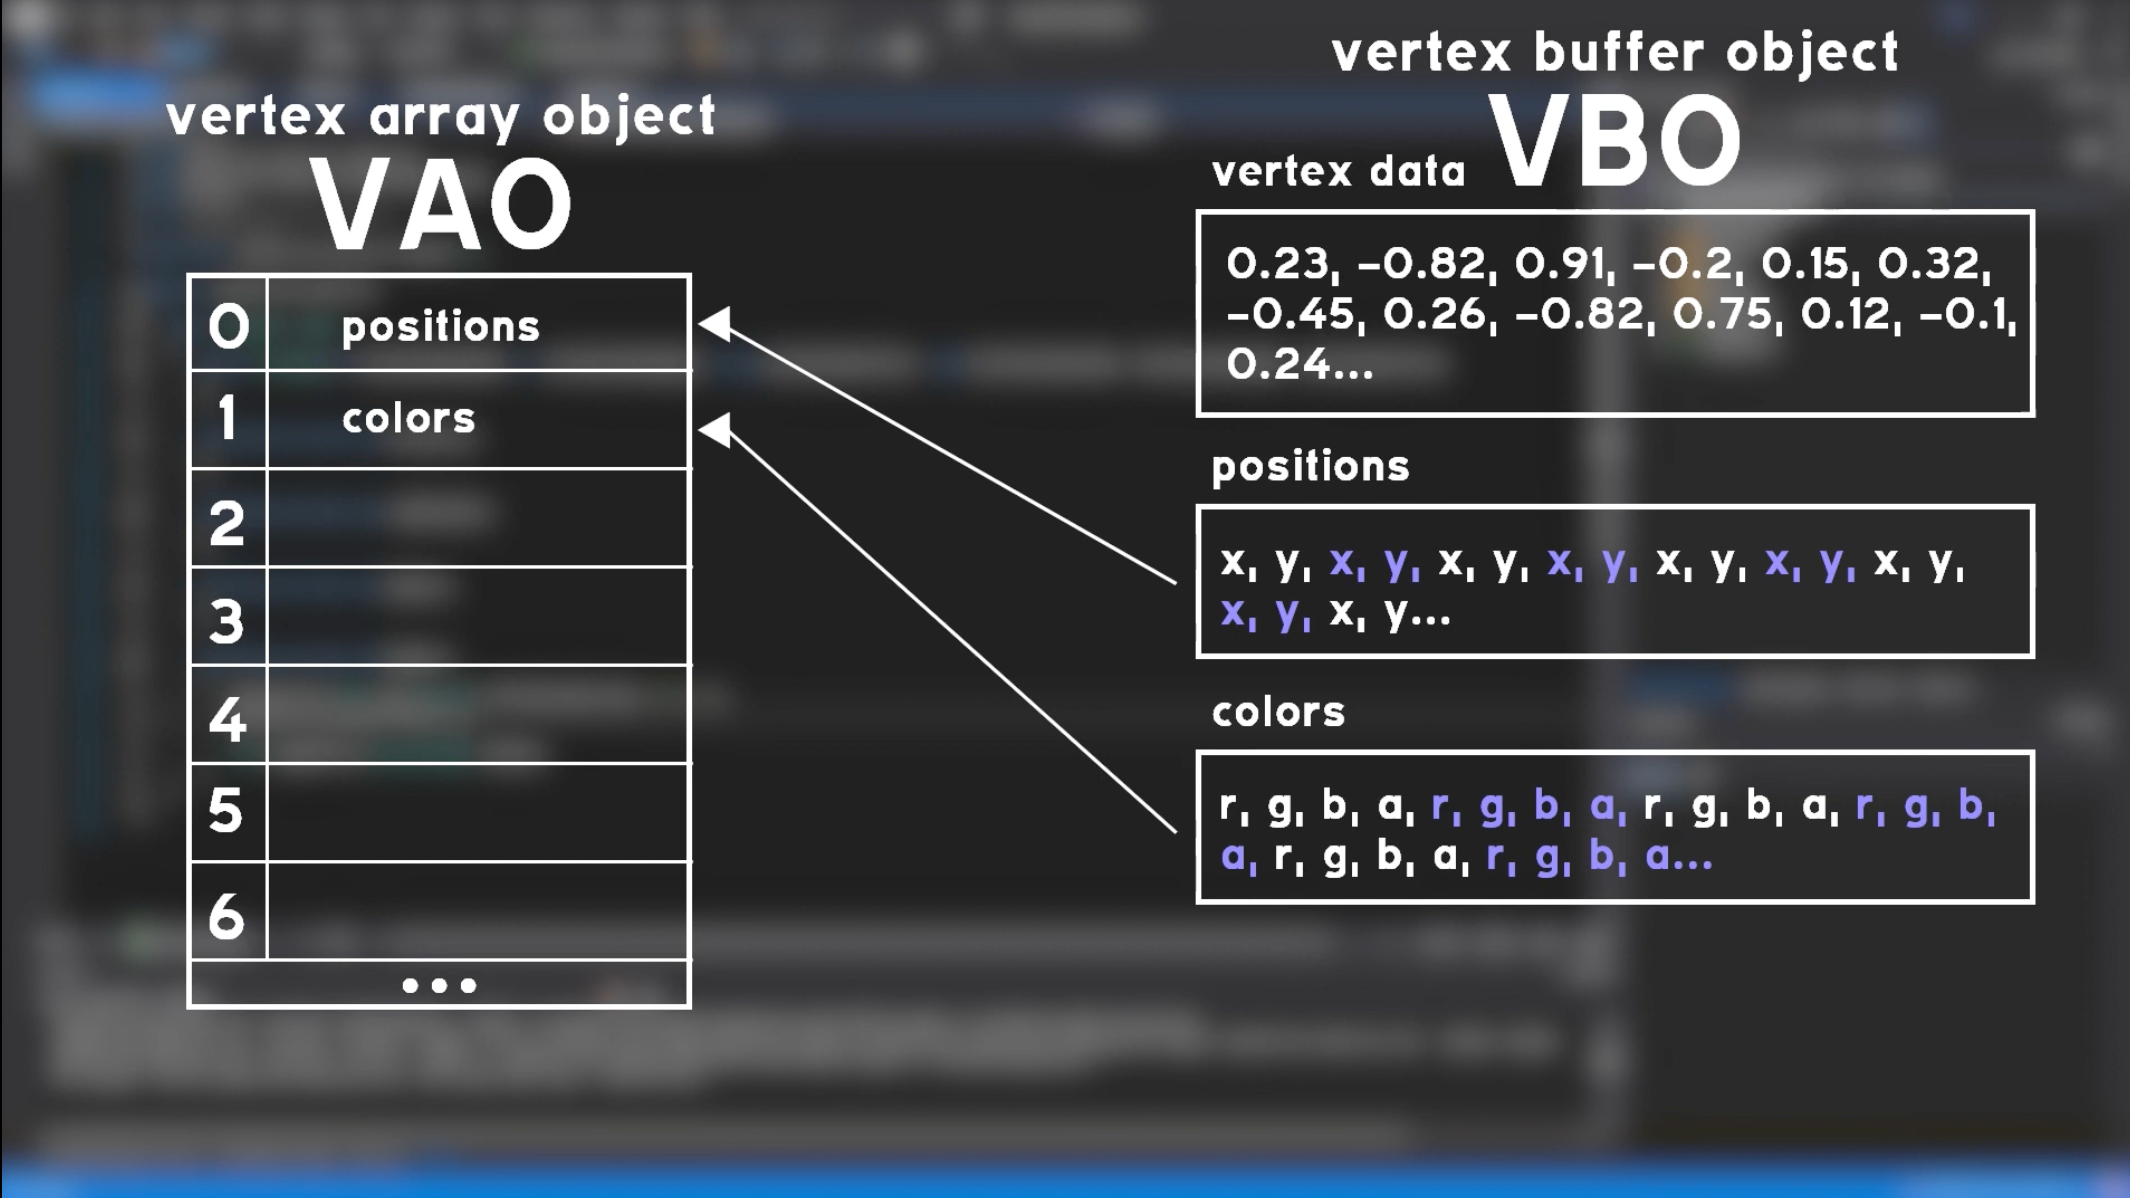
  • VAO(vertex-array object)顶点数组对象,用来管理VBO。
  • VBO(vertex buffer object)顶点缓冲对象,用来缓存用户传入的顶点数据。
  • EBO(element buffer object)索引缓冲对象,用来存放顶点索引数据。

A VAO is an array of VBOs


一、什么是OpenGL

OpenGL是一套方便于用户使用的规范,而其本身包含了调用不同厂商直接在GPU中写好的程序接口,那些接口完成所有的功能实现,如完成2D、3D矢量图形渲染等功能(跨语言,跨平台)。

OpenGL by itself is not an API, but merely a specification. The OpenGL specification specifies exactly what the result/output of each function should be and how it should perform. It is then up to the developers implementing this specification to come up with a solution of how this function should operate.
The people developing the actual OpenGL libraries are usually the graphics card manufacturers. Each graphics card that you buy supports specific versions of OpenGL which are the versions of OpenGL developed specifically for that card (series).

OpenGL vs OpenCL

  1. 总体来说,OpenGL 主要做图形渲染,OpenCL 主要用 GPU 做通用计算。图形渲染的主要特点是 渲染管线基本单元,如光栅化、深度测试、模板测试、混合等等的实现。
  2. OpenGL 可以用 Compute Shader 实现 OpenCL 同样的功能,但一般厂商对 Compute Shader 中低精度计算的支持(fp16 / int8 等)不如 OpenCL ,性能会差一些
  3. 基于 OpenCL 编程可以自己实现 OpenGL 中的渲染操作,但由于没有图形接口,实现渲染管线基本单元效率较低。
  4. OpenCL 和 OpenGL 最终实现都是往 GPU 发 Command Buffer ,不会互相影响,最多就是互相抢GPU计算资源。但如果有数据依赖关系,因为管线不同,两者是需要做额外同步的。

opengl里叫drawcall,opencl里叫enqueue,vulkan里叫commandbuffer,虽然叫法不一样,但目的都是把指令从CPU发到GPU上运算。

cuda其实就是把kernel代码和c代码混合到一起写而已,最终也要把数据发到GPU去算,属于编译器支持的隐式发送。就好比写c/c++调其他库api的时候,可以配置好库lib或者so位置,包个头文件就直接用,也可以自己动态加载对应库API一样。

OpenGL渲染过程

因为c++写的程序都是在cpu上运行的,但是OpenGL的接口是在GPU上运行的,而且OpenGL并不能凭空做程序中的数据或者是取代一些程序上的事,它是一种状态机,程序从cpu发数据到缓冲区并且告诉GPU你从哪一块缓冲区取数据画什么,然后提前设计好的着色器开始根据数据画图最后显示在显示器上。

画图渲染的顺序如下:

  1. 声明一个缓冲区
  2. 声明之后需要绑定,因为在GPU中的缓冲区都是有编号的,或者说是有管理的
  3. 现在要给一个缓冲区塞数据,每个接口函数都可以通过说明文档来查看参数的意义和使用
  4. 我们需要告诉着色器我们的数据是怎么样的, 或者说是怎么处理这些数据

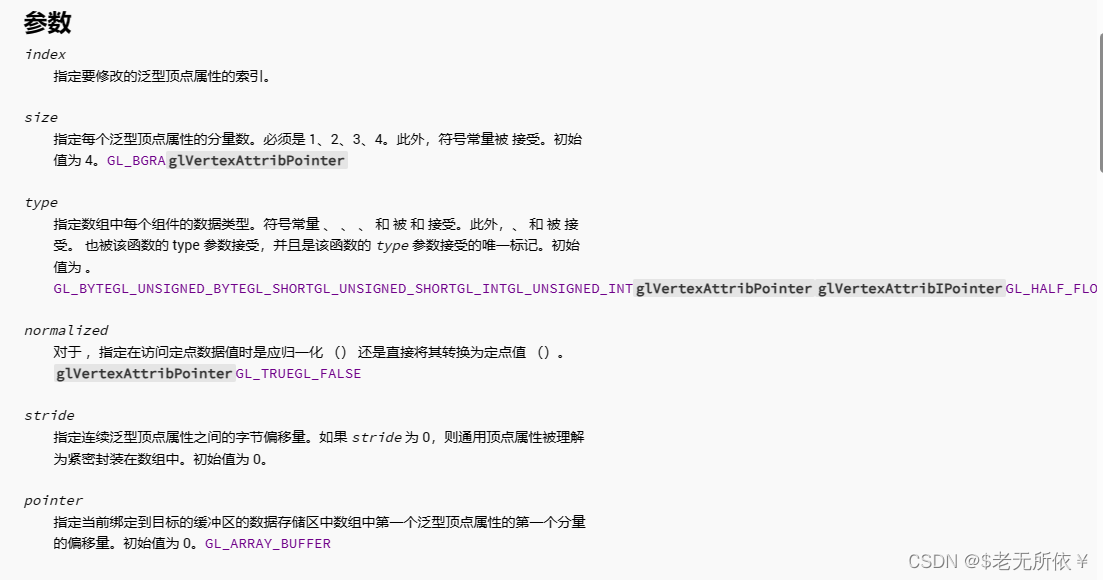
glVertexAttribPointer函数

1
2
void glVertexAttribPointer(GLuint index, GLint size, GLenum type,
GLboolean normalized, GLsizei stride, const GLvoid * pointer);

人话就是:

index:我们从第几个顶点开始访问
size:一个顶点属性值里面有几个数值
type:每个值的数据类型
normalized:是否要转化为统一的值
stride:步幅 每个顶点属性值的大小,就是到下一个顶点的开始的字节偏移量。
pointer:在开始访问到顶点属性值的时候开始的指针位置(注意和Index的区别)
其实你就是把顶点属性值想象成结构体就行了,然后多个结构体一起存,和网络传输一样,我发送给了另一边需要解析网络包,是不是需要找我结构体开始的位置,然后一个结构体的大小,然后结构体对齐里面有什么,分别解析,还有步幅指针,我还可以跳过结构体,是一样的道理。

二、VBO

glVertex

最原始的设置顶点方法,在glBegin和glEnd之间使用。OpenGL3.0已经废弃此方法。每个glVertex与GPU进行一次通信,十分低效。

1
2
3
4
5
glBegin(GL_TRIANGLES);
glVertex(0, 0);
glVertex(1, 1);
glVertex(2, 2);
glEnd();

顶点数组 Vertex Array

顶点数组也是收集好所有的顶点,一次性发送给GPU。不过数据不是存储于GPU中的,绘制速度上没有显示列表快,优点是可以修改数据。

1
2
3
4
5
#define MEDIUM_STARS 40
M3DVector2f vMediumStars[MEDIUM_STARS];
//在这做点vMediumStars的设置//
glVertexPointer(2, GL_FLOAT, 0, vMediumStars);
glDrawArrays(GL_POINTS, 0, MEDIUM_STARS);

VBO 顶点缓冲对象

VBO,全称为Vertex Buffer Object,与FBO,PBO并称,但它实际上老不少。就某种意义来说,他就是VA(Vertex Array)的升级版。VBO出现的背景是人们发现VA和显示列表还有让人不满足的地方。一般,在OpenGL里,提高顶点绘制的办法:

(1)显示列表:把常规的glBegin()-glEnd()中的代码放到一个显示列表中(通常在初始化阶段完成),然后每遍渲染都调用这个显示列表。
(2)VA:使用顶点数组,把顶点以及顶点属性数据作为数组,渲染的时候直接用一个或几个函数调动这些数组里的数据进行绘制,形式上是减少函数调用的次数(告别glVertex),提高绘制效率。

但是,这两种方法都有缺点。VA是在客户端设置的,所以执行这类函数(glDrawArray或glDrawElement)后,客户端还得把得到的顶点数据向服务端传输一次(所谓的“二次处理”),这样一来就有了不必要的动作了,降低了效率——如果我们写的函数能直接把顶点数据发送给服务端就好了——这正是VBO的特性之一。显示列表的缺点在于它的古板,一旦设定就不容许修改,所以它只适合对一些“固定”的东西的绘制进行包装。(我们无办法直接在硬件层改顶点数据,因为这是脱离了流水线的事物)。
而VBO直接把顶点数据交到流水线的第一步,与显示列表的效率还是有差距,但它这样就得到了操作数据的弹性——渲染阶段,我们的VBO绘制函数持续把顶点数据交给流水线,在某一刻我们可以把该帧到达了流水线的顶点数据取回客户端修改(Vertex mapping),再提交回流水线(Vertex unmapping),或者用 glBufferData/glBufferSubData 重新全部或buffer提交修改了的顶点数据,这是VBO的另一个特性。

VBO结合了VA和显示列表这个说法不太妥当,应该说它结合了两者的一些特性,绘制效率在两者之间,且拥有良好的数据更改弹性。这种折衷造就了它一直为目前最高的地位。

当我们在顶点着色器中把顶点传送到GPU中的时候,不能每个顶点数据传送一次,因为太耗时而且造成资源浪费,所以就要用到缓冲对象,我们把大量的数据存储在GPU内存上,然后一次传输大量数据到显卡上,顶点缓冲对象就是帮助我们来管理GPU内存的。

顶点缓冲流程

首先我们需要使用glVertexAttribPointer函数告诉OpenGL该如何解析顶点数据,一定要使用该函数来配置各个属性的数据,因为顶点数据不只包含位置,还可能会包含顶点颜色、顶点法线等等,那一个顶点数据是如何被OpenGL解析然后放入到顶点着色器的各个属性中,就需要通过该函数进行准确的配置。
每个顶点属性从一个VBO管理的内存中获得它的数据,而具体是从哪个VBO(程序中可以有多个VBO)获取则是通过在调用glVetexAttribPointer时绑定到GL_ARRAY_BUFFER的VBO决定的,因为同一个类型的缓冲区同时最多绑定一个目标缓冲。

三、VAO

VAO 顶点数组对象

VAO并不是必须的,VBO可以独立使用,VBO缓存了数据,而数据的使用 方式(glVertexAttribPointer 指定的数据宽度等信息)并没有缓存,VBO将顶点信息放到GPU中,GPU在渲染时去缓存中取数据,二者中间的桥梁是GL-Context。GL-Context整个程序一般只有一个,所以如果一个渲染流程里有两份不同的绘制代码,当切换VBO时(有多个VBO时,通过glBindBuffer切换 ),数据使用方式信息就丢失了。而GL-context就负责在他们之间进行切换。这也是为什么要在渲染过程中,在每份绘制代码之中会有glBindbuffer、glEnableVertexAttribArray、glVertexAttribPointer。VAO记录该次绘制所需要的所有VBO所需信息,把它保存到VBO特定位置,绘制的时候直接在这个位置取信息绘制。 

VAO的全名是Vertex Array Object,首先,它不是Buffer-Object,所以不用作存储数据;其次,它针对“顶点”而言,也就是说它跟“顶点的绘制”息息相关。我们每一次绘制的时候,都需要绑定缓冲对象以此来拿到顶点数据,都需要去配置顶点属性指针以便OpenGL知道如何来解析顶点数据,这是相当麻烦的,对一个多边形而言,它每次的配置都是相同的,如何来存储这个相同的配置呢。
VAO为我们解决了这个大麻烦,当配置顶点属性数据的时候,只需要将配置函数调用执行一次,随后再绘制该物体的时候就只需要绑定相应的VAO即可,这样,我们就可以通过绑定不同的VAO(提醒,与VBO一样,同一时刻只能绑定一个VAO),使得在不同的顶点数据和属性配置切换变得非常简单。VAO记录的是一次绘制中所需要的信息,这包括“数据在哪里glBindBuffer”、“数据的格式是怎么样的glVertexAttribPointer”、shader-attribute的location的启用glEnableVertexAttribArray。

1
2
glVertexAttribPointer(0, 3, GL_FLOAT, GL_FALSE, 3 * sizeof(float), (void*)0);
glEnableVertexAttribArray(0);

VAO的使用非常简单,要想使用VAO,要做的只是使用glBindVertexArray绑定VAO。从绑定之后起,我们应该绑定和配置对应的VBO和属性指针,配置完以后,VAO中就存储了我们想要的各种数据,之后解绑VAO供之后使用,再次使用需要我们再次绑定。

注意:glVertexAttribPointer()这个函数会自动从当前绑定的VBO里获取顶点数据,所以在第一节VBO里如果想要使用正确的顶点数据,每次都要绑定相应的VBO,但是现在,我们在绑定VBO之前绑定了VAO,那么glEnableVertexAttribPointer()所进行的配置就会保存在VAO中。我们可以通过不同的配置从一个VBO内拿到不同的数据放入不同的VAO中,这样VAO中就有了我们所需要的数据,它根据顶点配置到VBO中索取到数据,之后直接绑定相应的VAO即可,glDrawArrays()函数就是需要从VAO中拿到数据进行绘制。但是要明白的是,我们是通过VAO来间接绑定VBO的,实际上数据还是要存储在VBO中的,VAO内并没有存储顶点的数据,如果我们要绘制两个不同的三角形,我们可能需要定义两个VBO,每个VBO内有三个顶点数据。


Credits

OpenGL: https://learnopengl.com/Getting-started/OpenGL
VAO和VBO: https://blog.csdn.net/p942005405/article/details/103770259


Common Language Runtime

公共语言运行时

VM和LR其实比较类似,有人说LR的创建就是为了对标VM。简单来说,就是一个程序运行所需要的环境,包括各种资源、各种操作等等。不同语言、不同操作系统所需要的运行时环境都不一样。举个例子,Windows上的可执行程序都被包装成了.exe格式,而这种.exe格式文件提供了一个程序从加载到运行所需要的所有资源和环境。

而CLR提供了:

  1. 一个支持GC的虚拟机,该虚拟机有自己的一套指令集,即CIL(公共中间语言,COmmon Intermediate Language)。高级语言最终会转化成CIL,
  2. 一种丰富的元数据表示,用来描述数据类型、字段、方法等。通过这些统一的描述方法来生成对应的程序。
  3. 一种文件格式,一种专属的不于操作系统和硬件绑定的格式,即跨平台。
  4. 一套类库,提供了垃圾回收、异常、泛型等基本功能,提供了字符串、数组、列表、字典等数据结构,提供了文件、网络、交互等操作系统功能。
  5. 一系列规则,定制了在运行时如果查找引用其他文件、生命周期等一系列规则。


Common Language Specification

CLR最大的优势就在于跨语言跨平台支持。目前微软已经为多种语言开发旅了基于CLR的编译器,包括C++、C#、Visual Basic、F#、Iron Python、 Iron Ruby和IL。还有一些大学、公司和机构为一些语言也开发了基于CLR的编译器,包括da、APL、Caml、COBOL、Eiffel、Forth、Fortran、Haskell、Lexicon、LISP、LOGO、Lua、Mercury、ML、Mondrian、Oberon、Pascal、Perl、PHP、Prolog、RPG、Scheme、Smaltak、Tcl/Tk等。
CLR为不同的编程语言提供了统一的运行平台,对于开发者来说,他们无需考虑平台运行问题,无论使用什么语言开发,最终都会编译成IL,供CLR运行。对于CLR来说,它并不知道也无需知道IL是从什么语言编译过来的。

但是这么多种各式各样的语言最终都要编译成IL,肯定需要一种规范,CLS就是用来规范语言的。CLS全称Common Language Specification,即公共语言规范。也就是说所有被CLR支持的高级语言都需要最少支持CLS所规定的功能集。只要高级语言最少支持了CLS之后,其它附加功能/特性可自行实现。

Managed Code

C#中的托管代码是指由.NET运行时环境(CLR)管理和执行的代码。当我们使用C#编写的代码被编译后,它会被转换成中间语言(IL)代码,也称为托管代码。托管代码在运行时由CLR加载和执行,CLR负责内存管理、垃圾回收、安全性等任务,开发者无需过度关注资源的释放。其实可以从字面上理解,托管代码委托给CLR进行管理,开发者不管。
而至于非托管代码是指不受CLR管理的代码,通常是使用其他编程语言(如C++)编写的代码,比如操作系统代码、C#中的Socket、Stream等,这些代码无法通过CLR的GC完全释放占用的资源。一般来说,非托管的功能都被包装过了,比如当我们访问文件的时候,肯定不会直接使用操作系统的CreateFile函数,而是使用System.IO.File类。

托管代码具有以下特点:
自动内存管理:CLR负责分配和释放内存,开发人员无需手动管理内存。
垃圾回收:CLR会自动检测和回收不再使用的对象,减少内存泄漏的风险。
安全性:CLR提供了安全性机制,确保代码的执行不会对系统造成损害。
跨平台:托管代码可以在不同的操作系统上运行,只要有对应的CLR。

相对应的,非托管代码直接操作计算机的硬件和操作系统资源,需要手动管理内存和资源的分配和释放。非托管代码在性能方面可能更高效,但也更容易出现内存泄漏和安全问题。C#可以通过使用InteropServices命名空间中的功能与非托管代码进行交互,这样可以在C#中调用非托管代码的功能。

FCL

The Framework Class Library or FCL provides the system functionality in the .NET Framework as it has various classes, data types, interfaces, etc. to build different types of applications including desktop applications, web applications, mobile applications. The Framework Class Library is integrated with the Common Language Runtime (CLR) and is used by all the .NET languages such as C#, F#, Visual Basic .NET, etc.

BCL vs. FCL

  • The Base Class Library (BCL) is literally that, the base. It contains basic, fundamental types like System.String and System.DateTime.
  • The Framework Class Library (FCL) is the wider library that contains the totality: ASP.NET(web application framework 对标 Node.js), WinForms, the XML stack, ADO.NET and more. You could say that the FCL includes the BCL.

C# Compilers

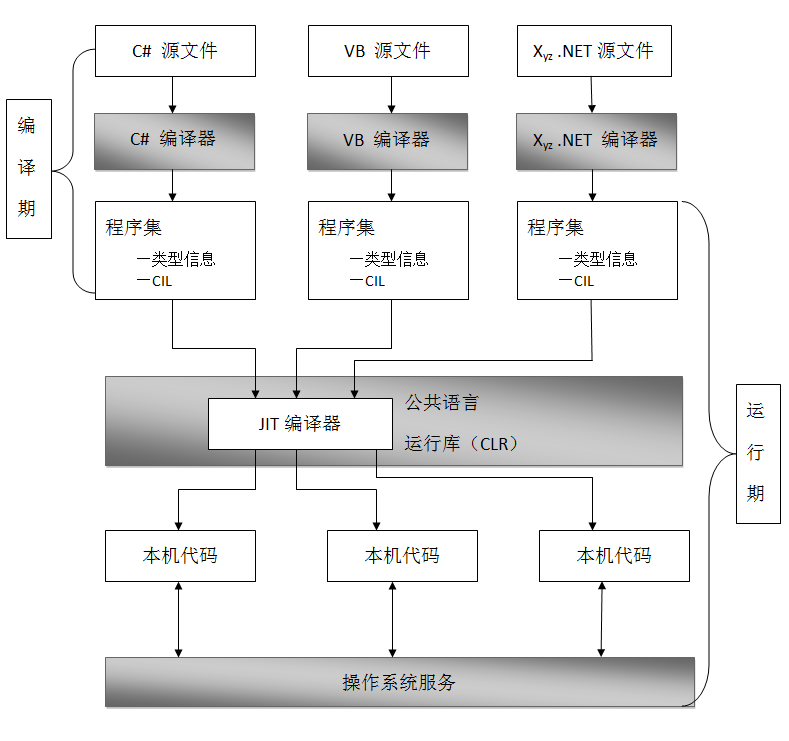
C#源文件通过编译器(如CSC.exe)编译成中间语言(IL)和元数据,生成.exe或.dll文件。IL是一种伪代码,独立于任何CPU,可以在任何装有.Net Framework的机器上运行‌

Common Intermediate Language (CIL), formerly called Microsoft Intermediate Language (MSIL) or Intermediate Language (IL) is the intermediate language binary instruction set defined within the Common Language Infrastructure (CLI) specification. CIL instructions are executed by a CIL-compatible runtime environment such as the Common Language Runtime. Languages which target the CLI compile to CIL. CIL is object-oriented, stack-based bytecode. Runtimes typically just-in-time compile CIL instructions into native code.

  • Just In Time compiler
    即时编译。当程序运行时,IL通过CLR中的即时编译器(JIT)将CIL的byte code编译为目标平台的原生码(针对特定CPU的机械码)。JIT编译是在程序运行时进行的,确保了代码的可移植性和执行效率‌程序运行过程中。
  • Ahead Of Time compiler
    提前编译。程序运行之前,提前编译器(AOT)将C#源码直接编译为目标平台的原生码并且存储。这种方式通常用于生成本地应用程序,提高启动速度和性能‌。

将.exe或.dll文件中的CIL的byte code

Unity compiler

Unity编译C#脚本的过程通常是自动进行的,当你在Unity编辑器中构建项目时(比如导出为执行文件或者打包为Android/iOS应用),Unity会编译所有C#脚本。
如果你需要在Unity编辑器外部编译C#代码,你可以使用Mono的mcs编译器或者.NET Core SDK。

以下是使用mcs编译器的基本命令行示例:

mcs -out:YourGame.exe -recurse:*.cs

Mono

Mono, the open source development platform based on the .NET Framework, helps developers to build cross-platform applications. Mono’s .NET implementation is based on the ECMA standards for C# and the Common Language Infrastructure. Mono was originally reimplementation of the .NET for linux. Today is much more.

Unity Mono

The Mono scripting backend compiles code at runtime, with a technique called just-in-time compilation (JIT). Unity uses a fork of the open source Mono project.
Some platforms don’t support JIT compilation, so the Mono backend doesn’t work on every platform. Other platforms support JIT and Mono but not ahead-of-time compilation (AOT), and so can’t support the IL2CPP backend. When a platform can support both backends, Mono is the default.

IL2CPP

The IL2CPP backend converts MSIL (Microsoft Intermediate Language) code (for example, C# code in scripts) into C++ code, then uses the C++ code to create a native binary file (for example, .exe, .apk, or .xap) for your chosen platform. This type of compilation, in which Unity compiles code specifically for a target platform when it builds the native binary, is called ahead-of-time (AOT) compilation.

How IL2CPP works

  1. The Roslyn C# compiler compiles your application’s C# code and any required package code to .NET DLLs (managed assemblies).
  2. Unity applies managed bytecode stripping(代码裁剪). This step can significantly reduce the size of a built application.
  3. The IL2CPP backend converts all managed assemblies into standard C++ code.
  4. The C++ compiler compiles the generated C++ code and the runtime part of IL2CPP with a native platform compiler.
  5. Unity creates either an executable file or a DLL, depending on the platform you target.

Mono vs. IL2CPP on Unity

Unity中C#代码的处理过程

  1. 编写C#代码:
    开发者在Unity编辑器中编写C#脚本,这些脚本通常用于实现游戏逻辑、控制角色行为、处理用户输入等。

  2. 编译C#代码:
    当开发者在Unity中保存C#脚本时,Unity会自动触发编译过程。Unity使用Mono或IL2CPP作为其脚本引擎。
    Mono:在使用Mono时,Unity会将C#代码编译成CIL(Common Intermediate Language)。这个过程是在Unity编辑器中完成的,生成的CIL代码会被打包到Unity的可执行文件中。
    IL2CPP:如果选择使用IL2CPP,Unity会将C#代码首先编译为CIL,然后将CIL代码转换为C++代码,最后再编译为本地机器代码。IL2CPP的主要优点是可以提高性能和安全性。

  3. 生成的CIL代码:
    生成的CIL代码会被打包到Unity的可执行文件中,通常是一个DLL文件。这个DLL文件包含了所有的游戏逻辑和功能。

  4. 构建过程:
    在构建游戏时,Unity会将所有的资源(如纹理、模型、音频等)和编译后的CIL代码打包成一个可执行文件(如EXE、APK、IPA等),具体取决于目标平台。
    Unity的构建系统会处理所有的依赖关系,确保所有需要的资源和代码都包含在最终的构建中。

  5. 运行时执行:
    当用户运行构建的游戏时,Unity的运行时环境会加载可执行文件。
    如果使用Mono,运行时会在需要时将CIL代码即时编译为本地机器代码(JIT编译)。如果使用IL2CPP,CIL代码已经在构建时转换为本地机器代码,因此可以直接执行。
    运行时会管理内存、处理输入、渲染图形等,确保游戏的正常运行。

  6. 总结
    在Unity中,开发者编写的C#代码会经过编译过程,生成CIL代码,并在构建时打包到可执行文件中。Unity使用Mono或IL2CPP作为脚本引擎,分别通过JIT编译或AOT编译将CIL代码转换为本地机器代码。这个过程使得Unity能够在不同平台上运行相同的代码,同时也为开发者提供了灵活的开发环境。

Cross-platform

Mono运行时编译器支持将IL代码转为对应平台原生码
IL可以在任何支持CLI,通用语言环境的平台上运行,IL的运行是依托于Mono运行时。

IOS Platform

IOS不支持动态生成的代码具有执行权限,而通常jit就是运行过程中动态编译代码为机器码并缓存/执行(Mono运行时将IL编译成机械码),即封存了内存的可执行权限,变相的封锁了jit编译方式


Credits

CLR简介:https://blog.csdn.net/weixin_42186870/article/details/119621977/
Mono简介:https://www.mono-project.com/docs/about-mono/
IL2CPP简介:https://docs.unity3d.com/6000.0/Documentation/Manual/scripting-backends-il2cpp.html
IOS平台代码热更:https://blog.csdn.net/qq_33060405/article/details/144314440


域名解析协议 Domain Name System

  1. DNS让用户能够通过域名访问网页(www.baidu.com -> 36.152.44.95)
  2. 计算机会先将域名发送到一个解析域名的服务器上
    2.1. 在网络上有很多服务器,能解析各种各样的域名,比如有专门解析.org的,解析.com的,解析.net的。等等,最主要的有一个根域名服务器(Root Name Server)
    2.2. 域名解析(在服务器上查找IP地址)的过程有两种算法,迭代查询,递归查询。一般是两种查询的结合
    2.3. 本机计算机找到其中一台解析域名的服务器(可能是.com),如果没有找到对应的IP地址,那么就会去找根域名服务器,根域名服务器知道所有的子服务器,
    所以他肯定知道该域名所对应的IP地址在那个子服务器中,所以告诉第一次查询的服务器要他去另一台服务器上找,找到了,就将其返回给计算机,
    以后在有另一台计算机也通过这个域名访问,那么第一台服务器会有原来的域名IP地址的缓存,就不用去找根服务器了。
    2.4. 找到了,就能找到我们要访问的服务器了。

根域名

图片
Root Domain is the highest hierarchical level of a site and is separated from the Top Level Domain by a dot (e.g. rootdomain.com).


A 记录

Address Record indicates the IP address of a given domain. For example, if you pull the DNS records of cloudflare.com, the A record currently returns an IP address of: 104.17.210.9. A records only hold IPv4 addresses. If a website has an IPv6 address, it will instead use an “AAAA” record.

图片

The “@” symbol in this example indicates that this is a record for the root domain, and the “14400” value is the TTL (time to live), listed in seconds. The default TTL for A records is 14,400 seconds. This means that if an A record gets updated, it takes 240 minutes (14,400 seconds) to take effect.


内容分发网络

内容分发网络 (CDN) 是一个分布在不同地理位置的服务器群,用于缓存靠近最终用户的内容。CDN 可以快速传输加载互联网内容所需的资产,包括 HTML 网页、JavaScript 文件、样式表、图像和视频。


CNAME 别名记录

CNAME记录,也叫别名记录,相当于给A记录中的域名起个小名儿,比如www.xx.com的小名儿就叫www.yy.com好了,然后CNAME记录也和A记录一样,是一种指向关系,把小名儿www.yy.com指向了www.xx.com,然后通过A记录,www.xx.com又指向了对应的IP:

www.yy.comwww.xx.com → 1.1.1.1

这样一来就能通过它的小名儿直接访问1.1.1.1了。


多个域名指向同一个地址

www.yy.comwww.xx.com → 1.1.1.1
www.cc.comwww.xx.com → 1.1.1.1
www.kk.comwww.xx.com → 1.1.1.1

突然服务器的IP地址因为一些不可描述的原因要换了,不再是1.1.1.1了,换成了2.2.2.2,这时候你发现,只要把www.xx.com的指向修改一下即可:

域名 www.xx.com → 2.2.2.2
这时候你又发现了,原来他的小名儿不需要做更改,直接就能访问服务器,因为他们都只指向了www.xx.com,服务器IP改没改它们不管。

那么假如不用CNAME,直接做A记录,那么当1.1.1.1更改的时候,全部相关A记录指向关系都要做更改

www.yy.com → 1.1.1.1
www.cc.com → 1.1.1.1
www.xx.com → 1.1.1.1
www.kk.com → 1.1.1.1


使用CDN

假如你是DD公司老板,你公司中的一台IP为1.1.1.1的服务器,注册了域名为www.dd.com,要对外提供客户访问。随着公司越做越大,访问量也越来越多,服务器顶不住了,你去找CDN提供商购买CDN加速服务,这个时候他们要求你的域名做个CNAME指向他们给你的一个域名叫www.dd.cdn.com

www.dd.comwww.dd.cdn.com

当用户访问www.dd.com的时候,本地DNS会获得CDN提供的CNAME域名:www.dd.cdn.com,然后再次向DNS调度系统发出请求,通过DNS调度系统的智能解析,把离客户端地理位置最近的(或者相对负载低的,主要看CDN那边智能解析的策略)CDN提供商的服务器IP返回给本地DNS,然后再由本地DNS回给客户端,让用户就近取到想要的资源(如访问网站),大大降低了延迟。

图片


Credits

域名解析:https://www.cloudflare.com/learning/dns/what-is-dns/
CNAME别名记录:https://blog.csdn.net/DD_orz/article/details/100034049


Unity 2022.3.55f1


问题:属性(Property)和访问器(Accessor)

如果在当前属性中直接添加自定义get和set访问器,在Unity引擎中访问/修改此属性时游戏会闪退。

1
2
3
4
5
6
7
8
9
public class TestClass : MonoBehaviour
{
public int TestProperty {
get { return TestProperty;}
set {
TestProperty = value;
}
}
}

解决方案

  1. 直接使用默认访问器
1
2
3
4
5
6
7
public class StartPage : MonoBehaviour
{
public int TestProperty {
get;
set;
}
}
  1. 创建一个新属性专门用于访问
1
2
3
4
5
6
7
8
9
10
11
public class StartPage : MonoBehaviour
{
private int testProperty;

public int TestProperty {
get { return testProperty;}
set {
testProperty = value;
}
}
}

问题:Start函数中使用不当loop循环

如果在start函数中使用while循环处理资源加载进度条,Unity引擎会在importing asset弹窗中卡死

1
2
3
4
5
6
7
8
9
10
11
12
13
14
15
16
17
18
19
20
21
22
23
public class TestClass : MonoBehaviour
{
[SerializeField] private Progressbar loadingBar;
[SerializeField] private AssetLabelReference gameImageAssets;

void Start() {
AsyncOperationHandle asyncHandle = Addressables.LoadAssetsAsync<Sprite>(gameImageAssets, _ => {});
asyncHandle.Completed += EnterGame;
StartCoroutine(GameLoadingCoroutine(asyncHandle));
}

private IEnumerator GameLoadingCoroutine(AsyncOperationHandle handle) {
// yield return Addressables.LoadAssetsAsync<Sprite>(gameImageAssets, _ => {});

while (!handle.IsDone && handle.PercentComplete < 1f)
loadingBar.SetProgressPercent(handle.PercentComplete);
}

private void EnterGame() {
// Disable Loading bar
// Enter gameplay
}
}

解决方案

使用协程(Coroutine)将while操作与Unity生命周期同步

1
2
3
4
5
6
7
8
9
10
11
12
13
14
15
16
17
18
19
20
21
22
23
24
25
26
27
public class TestClass : MonoBehaviour
{
[SerializeField] private Progressbar loadingBar;
[SerializeField] private AssetLabelReference gameImageAssets;

void Start() {
AsyncOperationHandle asyncHandle = Addressables.LoadAssetsAsync<Sprite>(gameImageAssets, _ => {});
StartCoroutine(GameLoadingCoroutine(asyncHandle));
}

private IEnumerator GameLoadingCoroutine(AsyncOperationHandle handle) {
while (!handle.IsDone && handle.PercentComplete < 1f) {
loadingBar.SetProgressPercent(handle.PercentComplete);
yield return null;
}

if (handle.Status == AsyncOperationStatus.Succeeded)
EnterGame();
else
Debug.LogError($"Failed to load game asset sprites: {handle.Status}");
}

private void EnterGame() {
// Disable Loading bar
// Enter gameplay
}
}

Socket vs Port

  • A TCP socket is an endpoint instance defined by an IP address and a port in the context of either a particular TCP connection or the listening state.
  • A port is a virtualisation identifier defining a service endpoint (as distinct from a service instance endpoint aka session identifier).
  • A TCP socket is not a connection, it is the endpoint of a specific connection.
  • There can be concurrent connections to a service endpoint, because a connection is identified by both its local and remote endpoints, allowing traffic to be routed to a specific service instance.
  • There can only be one listener socket for a given address/port combination.

Specifically, a TCP socket consists of five things:

  1. transport layer protocol,
  2. local address,
  3. local port,
  4. remote address,
  5. remote port

A port is a number between 1 and 65535 inclusive that signifies a logical gate in a device. Every connection between a client and server requires a unique socket.

For example:

  • 33123 is a port.
  • (localhost, 33123, 69.59.196.211, 80, TCP) is a socket.

Firefox (localhost:33123) <———–> stackoverflow.com (69.59.196.211:80)
Chrome (localhost:33124) <———–> stackoverflow.com (69.59.196.211:80)

When a client device accesses a website (such as Chrome sending HTTP requests), it automatically connects to port 80 on the web server to retrieve the requested content. When the web server receives the answer, it sends a response that has 80 as source port and 33123 as destination port.


Credits

网络编程与套接字:https://www.cnblogs.com/Sunbreaker/p/11318288.html


各层数据的组成形式

  • 数据单元(data unit)
    指许多信息单元。常用的数据单元有服务数据单元(SDU)、协议数据单元(PDU)。SDU是在同一机器上的两层之间传送信息。PDU是发送机器上每层的信息发送到接收机器上的相应层(同等层间交流用的)。

  • 分组/分片
    ip层的上层是传输层(tcp的头部为20Byte,udp头部字节是8Byte),ip层自己的头部需要占20字节,ip层的MTU = 1500 - 20 = 1480Byte, 超过1480Byte的数据,都需要被ip层分片,在达到目的前会自己重组

    • tcp是可靠传输协议,通过超时与重传机制,来保证收到的数据是完整的。因为tcp是可靠传输协议,如果要传输的数据大于 1480 - 20(tcp头部) =1460Byte时,在ip层被分片,而ip层分片会导致,如果其中的某一个分片丢失,因为tcp层不知道哪个ip数据片丢失,所以就需要重传整个数据段,这样就造成了很大空间和时间资源的浪费,为了解决这个问题,就有了tcp分组和MSS(最长报文大小)概念,利用tcp三次握手建立链接的过程,交互各自的MTU,然后用小的那个MTU-20-20 , 得到MSS,这样就避免在ip层被分片。
    • 由于udp是不可靠传输的,所以ip分片主要是为了upd服务的,所以就有了网上的 1500 - 20(ip头部) - 8(udp头部) > 1472Byte 的说法,把1472作为ip分片的标准
  • 报文(message) —— 应用层
    报文是网络中交换与传输的数据单元,也是网络传输的单元。报文包含了将要发送的完整的数据信息,其长短不需一致。报文在传输过程中会不断地封装成分组、包、帧来传输,封装的方式就是添加一些控制信息组成的首部,那些就是报文头。

  • 报文段(segment) —— 传输层
    组成报文的每个分组,将传输层分组称为报文段(面向连接(TCP)的数据传输)。报文段是起始点和目的地都是传输层的信息单元。

  • 数据报(datagram) —— 传输层
    面向无连接(Connectionless Communication)的数据传输,其工作过程类似于报文交换。采用数据报方式传输时,被传输的分组称为数据报。通常是指起始点和目的地都使用无连接网络服务的网络层的信息单元。(指IP数据报)

  • 数据包(packet) —— 网络层
    是网络层传输的数据单元,也成为“包”。包中带有足够寻址信息(IP地址),可独立地从源主机传输到目的主机。它的起始和目的地是网络层。

  • 帧(frame) —— 数据链路层
    帧是数据链路层的传输单元。它将上层传入的数据添加一个头部和尾部,组成了帧。它的起始点和目的点都是数据链路层。

  • 以太网帧

在以太网链路上的数据包称作以太帧。以太帧起始部分由前导码和帧开始符组成。后面紧跟着一个以太网报头,以MAC地址说明目的地址和源地址。帧的中部是该帧负载的包含其他协议报头的数据包(例如IP协议)。以太帧由一个32位冗余校验码结尾。它用于检验数据传输是否出现损坏。
在以太网帧中,Destination Address(目的地址)放在最前面。接收方收到一个以太网帧后,最先处理Destination Address字段。如果发现该帧不是发给自己的,后面的字段以及数据就不需要处理了。

什么是帧间距(IFG)

网络设备和组件在接收一个帧之后,需要一段短暂的时间来恢复并为接收下一帧.做准备互联网帧间隙共20字节,包括:

  • 以太网最小帧间隙 12Byte
  • 数据链路层帧 前导码 7Byte,用于时钟同步 This is a sequence of alternate 0s and 1s that denotes the beginning of the frame and enables bit synchronization between the sender and receiver.
  • 帧开始标识 1Byte (标识帧的开始)
  • 比特流(bitstream) —— 物理层

各层间数据传递

  • 不同的协议层对数据包有不同的称谓,在传输层叫做段(segment),在⽹络层叫做数据包 (datagram),在链路层叫做帧(frame)。
  • 应⽤层数据通过协议栈发到⽹络上时,每层协议都要加上⼀个数据⾸部(header),称为封装 (Encapsulation)。
  • ⾸部信息中包含了⼀些类似于⾸部有多⻓,载荷(payload)有多⻓,上层协议是什么等信息。
  • 数据封装成帧后发到传输介质上,到达⽬的主机后每层协议再剥掉相应的⾸部,根据⾸部中的 “上层协议字段” 将数据交给对应的上层协议处理。


数据的封装过程(从上至下)

传输层:报文被分为多个报文段,每个报文段上加上TCP首部(主要包含端口、源端口),变为TCP报文段;(注:TCP叫TCP报文段,UDP叫UDP数据报,也有人叫UDP段)
网络层:将TCP报文段加上IP数据包首部(主要包含目的IP,源IP),变成数据包;
数据链路层:将数据包加上目标MAC与源MAC、FCS(Frame Check Sequence)、变成MAC帧。
物理层:将帧变为比特流,传递给PC3物理层。


数据传输计量单位

Maximum Transmission Unit:最大传输单元,链路层的帧中的数据部分的最大字节数,以太网中的一般为1500字节。

Maximum Segment Size:TCP的报文段中的数据部分的最大字节数,MTU减去IPv4的Header和TCP的Header。IPv4的Header和TCP的Header一般都是20字节,则 1500-20-20 = 1460字节。

Maximum Segment Lifetime:报文最大生存时间。报文在网络上存在的最长时间,超过这个时间报文将被丢弃。当TCP执行一个主动关闭,并发回最后一个ACK,该连接必须在TIME_WAIT状态停留的时间为2倍的MSL。这样可让TCP再次发送最后的ACK以防这个ACK丢失(另一端超时并重发最后的FIN)。存在这个规则导致一个后果就是在这个2MSL的时间内,该地址上的链接(客户端地址、端口和服务器端的地址、端口)不能被使用。比如我们在建立一个链接后关闭链接然后迅速重启链接,那么就会出现端口不可用的情况。

Round Trip Time:往返时延。在计算机网络中它是一个重要的性能指标,表示从发送端发送数据结束,到发送端收到来自接收端的确认数据总共经历的时延。RTT=传播时延(往返哒)+ 排队时延(路由器和交换机的)+ 数据处理时延(应用程序的)。

Time To Live:IP头部有一个TTL域,TTL是time to live的缩写,中文可以译为“生存时间”,这个生存时间是由源主机设置初始值,但不是具体的时间,而是存储了一个IP数据报可以经过的最大路由数,每经过一个路由器此值就减1,当此值为0则数据报将被丢弃,同时发送ICMP报文通知源主机。


Credits

数据包:https://blog.csdn.net/a3192048/article/details/84671340


TCP/IP网络模型各层协议功能

1. 应用层

应用层是网络通信的最高层,它定义了应用程序和网络之间的接口。在这一层,用户可以直接与应用程序进行交互。常见的应用层协议有HTTP、FTP、SMTP等。

  • Proxy
    A proxy server (forward proxy) takes requests from a client and forwards them to the internet, a reverse proxy takes requests from the internet and forwards them to a server.

  • Transport Layer Security
    SSL/TLS uses asymmetric encryption is used to establish a secure session between a client and a server, and symmetric encryption is used to exchange data within the secured session.
    密钥:数据的加密是通过密钥进行的,通过密钥,明文被加密成密文。密钥分为对称加密密钥和非对称加密密钥。密钥为一段随机生成的数,通常以 .pem或者 .key文件保存,可以使用Openssl生成。
    对称加密:加密解密都是使用同一个密钥。服务器使用该密钥进行加密,经过传输后客户端使用该密钥解密。该方式效率高,但存在安全隐患。
    非对称加密:非对称加密具有一个密钥对,公钥和私钥,理论上来说公钥和私钥并不区分,便于区分将保存在本地的那个叫做私钥,将需要传输给对方的那个叫做公钥。数据经过私钥加密后,只能由对应的公钥解密,同样数据经过公钥加密后,只能由对应的私钥解密。那么只要客户端拥有服务器的公钥,通过公钥加密报文,服务器用自己的私钥解密就可以实现对传输过程的加密。非对称加密的效率比较低,而且仍有被中间人攻击的风险。
    证书颁发机构:CA机构是权威的第三方,机构本身具有自己的CA公钥与CA私钥,CA公钥是发给全体互联网成员的,可以将其称为CA证书。服务器需要将自己的 公钥以及认证信息经过HASH加密后发改CA机构,CA机构使用CA私钥对提交的信息进行加密,这就得到了带有数字签名的数据。在使用时使用CA公钥对带有数字签名的数据解密,得到经HASH后的数据,同时将公钥以及认证信息 经过HASH加密后与CA解密后的数据比对,验证电子签名的安全性。

2. 传输层

传输层负责在源主机和目标主机(端到端)之间建立数据传输通道,主要协议有TCP和UDP。

3. 网络层

网络层负责在网络上寻址和路由数据包。它定义了数据在网络中的传输路径,使得数据可以从源主机传输到目标主机。常见的网络层协议有IP协议。

  • 地址解析协议
    ARP(Address Resolution Protocol,地址解析协议)是用来将IP地址解析为MAC地址的协议。主机或三层网络设备上会维护一张ARP表,用于存储IP地址和MAC地址的映射关系

4. 数据链路层

数据链路层协议负责将网络层传输的数据分组封装成帧,传输到物理层,并通过物理介质进行传输。常见的数据链路层协议有以太网和Wi-Fi等。

5. 物理层

物理层是网络通信的最底层,它负责在物理介质上传输比特流。它定义了物理连接的特性,如电压、频率等。常见的物理层介质有光纤、双绞线等。


二层设备和三层设备

二层设备是工作数据链路层的设备。二层交换机可以识别数据包中的MAC地址信息,根据MAC地址进行转发,并将这些MAC地址与对应的端口记录在自己内部的一个地址表中。具体的工作流程如下:
(1) 当交换机从某个端口收到一个数据包,它先读取包头中的源MAC地址,这样它就知道源MAC地址的机器是连在哪个端口上的;
(2) 再去读取包头中的目的MAC地址,并在地址表中查找相应的端口;
(3) 如表中有与这目的MAC地址对应的端口,把数据包直接复制到这端口上;
(4) 如表中找不到相应的端口则把数据包广播到所有端口上,当目的机器对源机器回应时,交换机又可以学习一目的MAC地址与哪个端口对应,在下次传送数据时就不再需要对所有端口进行广播了。
不断的循环这个过程,对于全网的MAC地址信息都可以学习到,二层交换机就是这样建立和维护它自己的地址表。

三层设备是工作在网络层的设备。路由器是最常用的三层设备,利用不同网络的ID号(即IP地址)来确定数据转发的地址。IP地址是在软件中实现的,描述的是设备所在的网络,有时这些第三层的地址也称为协议地址或者网络地址。


Credits

详解TCP/IP五层网络模型:https://blog.csdn.net/2201_75437633/article/details/137373813
TLS/SSL:https://blog.csdn.net/weixin_44640149/article/details/134667685


Stack vs. Heap

In C#, primitive types such as int, double, and bool are all structs. Arrays of int are allocated on heap as int structs, only pointer to them will be allocated on stack.
To make a fixed size array be stored on stack, you need to use the stackalloc keyword, either with unsafe block or Span type.

unsafe关键词示例
1
2
3
4
public void unsafe foo(int length)
{
int* bar = stackalloc int [length];
}
type Span示例
1
2
3
4
public void foo(int length)
{
Span<int> bar = stackalloc int [length];
}

unsafe

unsafe关键字用于声明不安全的代码块。在C#中,默认情况下,代码是安全的,这意味着它遵循.NET的安全规则,包括对内存的访问控制。使用unsafe关键字可以告诉编译器,你了解并信任这段代码,即使它可能违反安全规则。

使用unsafe关键字需要满足一些条件:

  1. 你的项目必须被标记为允许不安全代码(通过在项目的属性中设置Allow Unsafe Code)。
  2. 你的代码必须在unsafe代码块中。
  3. 你必须使用fixed关键字来固定内存块。

fixed

fixed 关键字在 C# 中主要用于固定内存地址,通常与不安全代码(unsafe)一起使用。当你在不安全的代码中直接访问内存时,使用 fixed 关键字可以确保内存地址在程序运行期间保持不变。

使用 fixed 关键字的主要原因是:在垃圾回收过程中,垃圾回收器可能会移动内存中的对象。如果一个指针指向一个对象,而该对象在垃圾回收过程中被移动,那么该指针就会变得无效。通过使用 fixed 关键字,你可以告诉垃圾回收器不要移动这个对象,从而确保指针始终指向有效的内存地址。

fixed关键字示例
1
2
3
4
5
6
7
8
9
10
11
12
13
14
unsafe class Example  
{
int[] array = new int[10];
fixed int* ptr = stackalloc int[] { 1, 2, 3 };

void Method()
{
int* p = ptr; // 这里的p指向一个固定的内存地址
for (int i = 0; i < array.Length; i++)
{
*(p + i) = array[i]; // 将数组的值赋给固定的内存地址
}
}
}

在这个例子中,我们创建了一个固定大小的数组 ptr,并在方法 Method 中使用它来修改另一个数组 array 的值。因为 ptr 是用 fixed 关键字声明的,所以它指向的内存地址在 Method 执行期间是固定的,不会发生位移

checked

checked关键字用于在算术运算中控制溢出检查。默认情况下,当一个整数运算结果超出了该类型的表示范围时,会抛出System.OverflowException异常。使用checked关键字可以强制执行溢出检查,并在发生溢出时抛出异常。

checked关键字示例
1
2
3
4
5
6
7
8
9
10
11
12
13
14
15
16
17
18
19
20
21
22
23
24
25
26
27
28
29
30
31
class Program  
{
static unsafe void Main(string[] args)
{
int maxValue = int.MaxValue;
int* ptr = stackalloc int[] { maxValue }; // 创建一个固定大小的数组
fixed (int* p = ptr) // 使用fixed关键字固定内存地址
{
*(p + 1) = 0; // 尝试访问超出数组范围的内存,这会导致未定义的行为(除非使用unsafe代码)
}
Console.WriteLine(ptr[1]); // 这将输出0,因为我们在不安全的代码中修改了内存
}
}
uint a = uint.MaxValue;

unchecked
{
Console.WriteLine(a + 3); // output: 2
}

try
{
checked
{
Console.WriteLine(a + 3);
}
}
catch (OverflowException e)
{
Console.WriteLine(e.Message); // output: Arithmetic operation resulted in an overflow.
}

输出:
2
Arithmetic operation resulted in an overflow.

如果没有checked,那么输出的就是2,不会抛出异常也不会提示结果实际上已经超出范围了。导致程序发生一些不可预估的问题;

在这个例子中,我们创建了一个固定大小的数组,并在一个fixed代码块中修改了数组外的内存。因为我们使用了unsafe和fixed关键字,所以这是合法的。但请注意,试图访问数组外的内存是一种未定义的行为,可能会导致程序崩溃或其他不可预测的结果。


Credits

https://blog.csdn.net/qq_31418645/article/details/135245645


显示器类别

根据显示技术和用途的不同,显示器可以分为多种类型,主要包括:

  • 阴极射线管显示器(CRT)
  • 液晶显示器(LCD)
  • 发光二极管显示器(LED)
  • 等离子显示器(PDP)
  • 有机发光二极管显示器(OLED)
  • 量子点显示器(QLED)

VSync 工作原理

What is VSync? VSync stands for Vertical Synchronization. The basic idea is that synchronizes your FPS with your monitor’s refresh rate. The purpose is to eliminate something called “tearing”. I will describe all these things here.

Every CRT monitor has a refresh rate. It’s specified in Hz (Hertz, cycles per second). It is the number of times the monitor updates the display per second. Different monitors support different refresh rates at different resolutions. They range from 60Hz at the low end up to 100Hz and higher. Note that this isn’t your FPS as your games report it. If your monitor is set at a specific refresh rate, it always updates the screen at that rate, even if nothing on it is changing. On an LCD, things work differently. Pixels on an LCD stay lit until they are told to change; they don’t have to be refreshed. However, because of how VGA (and DVI) works, the LCD must still poll the video card at a certain rate for new frames. This is why LCD’s still have a “refresh rate” even though they don’t actually have to refresh.

I think everyone here understands FPS. It’s how many frames the video card can draw per second. Higher is obviously better. However, during a fast paced game, your FPS rarely stays the same all the time. It moves around as the complexity of the image the video card has to draw changes based on what you are seeing. This is where tearing comes in.

Tearing is a phenomenon that gives a disjointed image. The idea is as if you took a photograph of something, then rotated your vew maybe just 1 degree to the left and took a photograph of that, then cut the two pictures in half and taped the top half of one to the bottom half of the other. The images would be similar but there would be a notable difference in the top half from the bottom half. This is what is called tearing on a visual display. It doesn’t always have to be cut right in the middle. It can be near the top or the bottom and the separation point can actually move up or down the screen, or seem to jump back and forth between two points.

Why does this happen? Lets take a specific example. Let’s say your monitor is set to a refresh rate of 75Hz. You’re playing your favorite game and you’re getting 100FPS right now. That means that the mointor is updating itself 75 times per second, but the video card is updating the display 100 times per second, that’s 33% faster than the mointor. So that means in the time between screen updates, the video card has drawn one frame and a third of another one. That third of the next frame will overwrite the top third of the previous frame and then get drawn on the screen. The video card then finishes the last 2 thirds of that frame, and renders the next 2 thirds of the next frame and then the screen updates again. As you can see this would cause this tearing effect as 2 out of every 3 times the screen updates, either the top third or bottom third is disjointed from the rest of the display. This won’t really be noticeable if what is on the screen isn’t changing much, but if you’re looking around quickly or what not this effect will be very apparant.

Now this is where the common misconception comes in. Some people think that the solution to this problem is to simply create an FPS cap equal to the refresh rate. So long as the video card doesn’t go faster than 75 FPS, everything is fine, right? Wrong.

Before I explain why, let me talk about double-buffering. Double-buffering is a technique that mitigates the tearing problem somewhat, but not entirely. Basically you have a frame buffer and a back buffer. Whenever the monitor grabs a frame to refresh with, it pulls it from the frame buffer. The video card draws new frames in the back buffer, then copies it to the frame buffer when it’s done. However the copy operation still takes time, so if the monitor refreshes in the middle of the copy operation, it will still have a torn image.

VSync solves this problem by creating a rule that says the back buffer can’t copy to the frame buffer until right after the monitor refreshes. With a framerate higher than the refresh rate, this is fine. The back buffer is filled with a frame, the system waits, and after the refresh, the back buffer is copied to the frame buffer and a new frame is drawn in the back buffer, effectively capping your framerate at the refresh rate.

That’s all well and good, but now let’s look at a different example. Let’s say you’re playing the sequel to your favorite game, which has better graphics. You’re at 75Hz refresh rate still, but now you’re only getting 50FPS, 33% slower than the refresh rate. That means every time the monitor updates the screen, the video card draws 2/3 of the next frame. So lets track how this works. The monitor just refreshed, and frame 1 is copied into the frame buffer. 2/3 of frame 2 gets drawn in the back buffer, and the monitor refreshes again. It grabs frame 1 from the frame buffer for the first time. Now the video card finishes the last third of frame 2, but it has to wait, because it can’t update until right after a refresh. The monitor refreshes, grabbing frame 1 the second time, and frame 2 is put in the frame buffer. The video card draws 2/3 of frame 3 in the back buffer, and a refresh happens, grabbing frame 2 for the first time. The last third of frame 3 is draw, and again we must wait for the refresh, and when it happens, frame 2 is grabbed for the second time, and frame 3 is copied in. We went through 4 refresh cycles but only 2 frames were drawn. At a refresh rate of 75Hz, that means we’ll see 37.5FPS. That’s noticeably less than 50FPS which the video card is capable of. This happens because the video card is forced to waste time after finishing a frame in the back buffer as it can’t copy it out and it has nowhere else to draw frames.

Essentially this means that with double-buffered VSync, the framerate can only be equal to a discrete set of values equal to Refresh / N where N is some positive integer. That means if you’re talking about 60Hz refresh rate, the only framerates you can get are 60, 30, 20, 15, 12, 10, etc etc. You can see the big gap between 60 and 30 there. Any framerate between 60 and 30 your video card would normally put out would get dropped to 30.

Now maybe you can see why people loathe it. Let’s go back to the original example. You’re playing your favorite game at 75Hz refresh and 100FPS. You turn VSync on, and the game limits you to 75FPS. No problem, right? Fixed the tearing issue, it looks better. You get to an area that’s particularly graphically intensive, an area that would drop your FPS down to about 60 without VSync. Now your card cannot do the 75FPS it was doing before, and since VSync is on, it has to do the next highest one on the list, which is 37.5FPS. So now your game which was running at 75FPS just halved it’s framerate to 37.5 instantly. Whether or not you find 37.5FPS smooth doesn’t change the fact that the framerate just cut in half suddenly, which you would notice. This is what people hate about it.

If you’re playing a game that has a framerate that routinely stays above your refresh rate, then VSync will generally be a good thing. However if it’s a game that moves above and below it, then VSync can become annoying. Even worse, if the game plays at an FPS that is just below the refresh rate (say you get 65FPS most of the time on a refresh rate of 75Hz), the video card will have to settle for putting out much less FPS than it could (37.5FPS in that instance). This second example is where the percieved drop in performance comes in. It looks like VSync just killed your framerate. It did, technically, but it isn’t because it’s a graphically intensive operation. It’s simply the way it works.

All hope is not lost however. There is a technique called triple-buffering that solves this VSync problem. Lets go back to our 50FPS, 75Hz example. Frame 1 is in the frame buffer, and 2/3 of frame 2 are drawn in the back buffer. The refresh happens and frame 1 is grabbed for the first time. The last third of frame 2 are drawn in the back buffer, and the first third of frame 3 is drawn in the second back buffer (hence the term triple-buffering). The refresh happens, frame 1 is grabbed for the second time, and frame 2 is copied into the frame buffer and the first part of frame 3 into the back buffer. The last 2/3 of frame 3 are drawn in the back buffer, the refresh happens, frame 2 is grabbed for the first time, and frame 3 is copied to the frame buffer. The process starts over. This time we still got 2 frames, but in only 3 refresh cycles. That’s 2/3 of the refresh rate, which is 50FPS, exactly what we would have gotten without it. Triple-buffering essentially gives the video card someplace to keep doing work while it waits to transfer the back buffer to the frame buffer, so it doesn’t have to waste time. Unfortunately, triple-buffering isn’t available in every game, and in fact it isn’t too common. It also can cost a little performance to utilize, as it requires extra VRAM for the buffers, and time spent copying all of them around. However, triple-buffered VSync really is the key to the best experience as you eliminate tearing without the downsides of normal VSync (unless you consider the fact that your FPS is capped a downside… which is silly because you can’t see an FPS higher than your refresh anyway).

I hope this was informative, and will help people understand the intracacies of VSync (and hopefully curb the “VSync, yes or no?” debates!). Generally, if triple buffering isn’t available, you have to decide whether the discrete framerate limitations of VSync and the issues that can cause are worth the visual improvement of the elimination of tearing. It’s a personal preference, and it’s entirely up to you.


Credits

VSync explanation: https://hardforum.com/threads/how-vsync-works-and-why-people-loathe-it.928593/

CRT显示器和各类显示器比较:https://blog.csdn.net/m0_69378371/article/details/145129033