乌啦呀哈呀哈乌啦!

欢迎光临,这里是喵pass的个人博客,希望有能帮到你的地方

0%

域名解析协议 Domain Name System

  1. DNS让用户能够通过域名访问网页(www.baidu.com -> 36.152.44.95)
  2. 计算机会先将域名发送到一个解析域名的服务器上
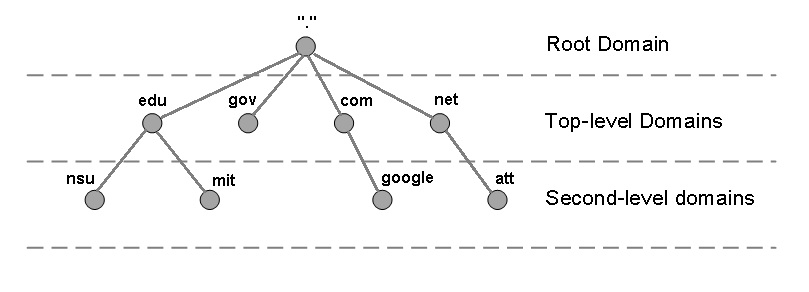
    2.1. 在网络上有很多服务器,能解析各种各样的域名,比如有专门解析.org的,解析.com的,解析.net的。等等,最主要的有一个根域名服务器(Root Name Server)
    2.2. 域名解析(在服务器上查找IP地址)的过程有两种算法,迭代查询,递归查询。一般是两种查询的结合
    2.3. 本机计算机找到其中一台解析域名的服务器(可能是.com),如果没有找到对应的IP地址,那么就会去找根域名服务器,根域名服务器知道所有的子服务器,
    所以他肯定知道该域名所对应的IP地址在那个子服务器中,所以告诉第一次查询的服务器要他去另一台服务器上找,找到了,就将其返回给计算机,
    以后在有另一台计算机也通过这个域名访问,那么第一台服务器会有原来的域名IP地址的缓存,就不用去找根服务器了。
    2.4. 找到了,就能找到我们要访问的服务器了。

根域名

图片
Root Domain is the highest hierarchical level of a site and is separated from the Top Level Domain by a dot (e.g. rootdomain.com).


A 记录

Address Record indicates the IP address of a given domain. For example, if you pull the DNS records of cloudflare.com, the A record currently returns an IP address of: 104.17.210.9. A records only hold IPv4 addresses. If a website has an IPv6 address, it will instead use an “AAAA” record.

图片

The “@” symbol in this example indicates that this is a record for the root domain, and the “14400” value is the TTL (time to live), listed in seconds. The default TTL for A records is 14,400 seconds. This means that if an A record gets updated, it takes 240 minutes (14,400 seconds) to take effect.


内容分发网络

内容分发网络 (CDN) 是一个分布在不同地理位置的服务器群,用于缓存靠近最终用户的内容。CDN 可以快速传输加载互联网内容所需的资产,包括 HTML 网页、JavaScript 文件、样式表、图像和视频。


CNAME 别名记录

CNAME记录,也叫别名记录,相当于给A记录中的域名起个小名儿,比如www.xx.com的小名儿就叫www.yy.com好了,然后CNAME记录也和A记录一样,是一种指向关系,把小名儿www.yy.com指向了www.xx.com,然后通过A记录,www.xx.com又指向了对应的IP:

www.yy.comwww.xx.com → 1.1.1.1

这样一来就能通过它的小名儿直接访问1.1.1.1了。


多个域名指向同一个地址

www.yy.comwww.xx.com → 1.1.1.1
www.cc.comwww.xx.com → 1.1.1.1
www.kk.comwww.xx.com → 1.1.1.1

突然服务器的IP地址因为一些不可描述的原因要换了,不再是1.1.1.1了,换成了2.2.2.2,这时候你发现,只要把www.xx.com的指向修改一下即可:

域名 www.xx.com → 2.2.2.2
这时候你又发现了,原来他的小名儿不需要做更改,直接就能访问服务器,因为他们都只指向了www.xx.com,服务器IP改没改它们不管。

那么假如不用CNAME,直接做A记录,那么当1.1.1.1更改的时候,全部相关A记录指向关系都要做更改

www.yy.com → 1.1.1.1
www.cc.com → 1.1.1.1
www.xx.com → 1.1.1.1
www.kk.com → 1.1.1.1


使用CDN

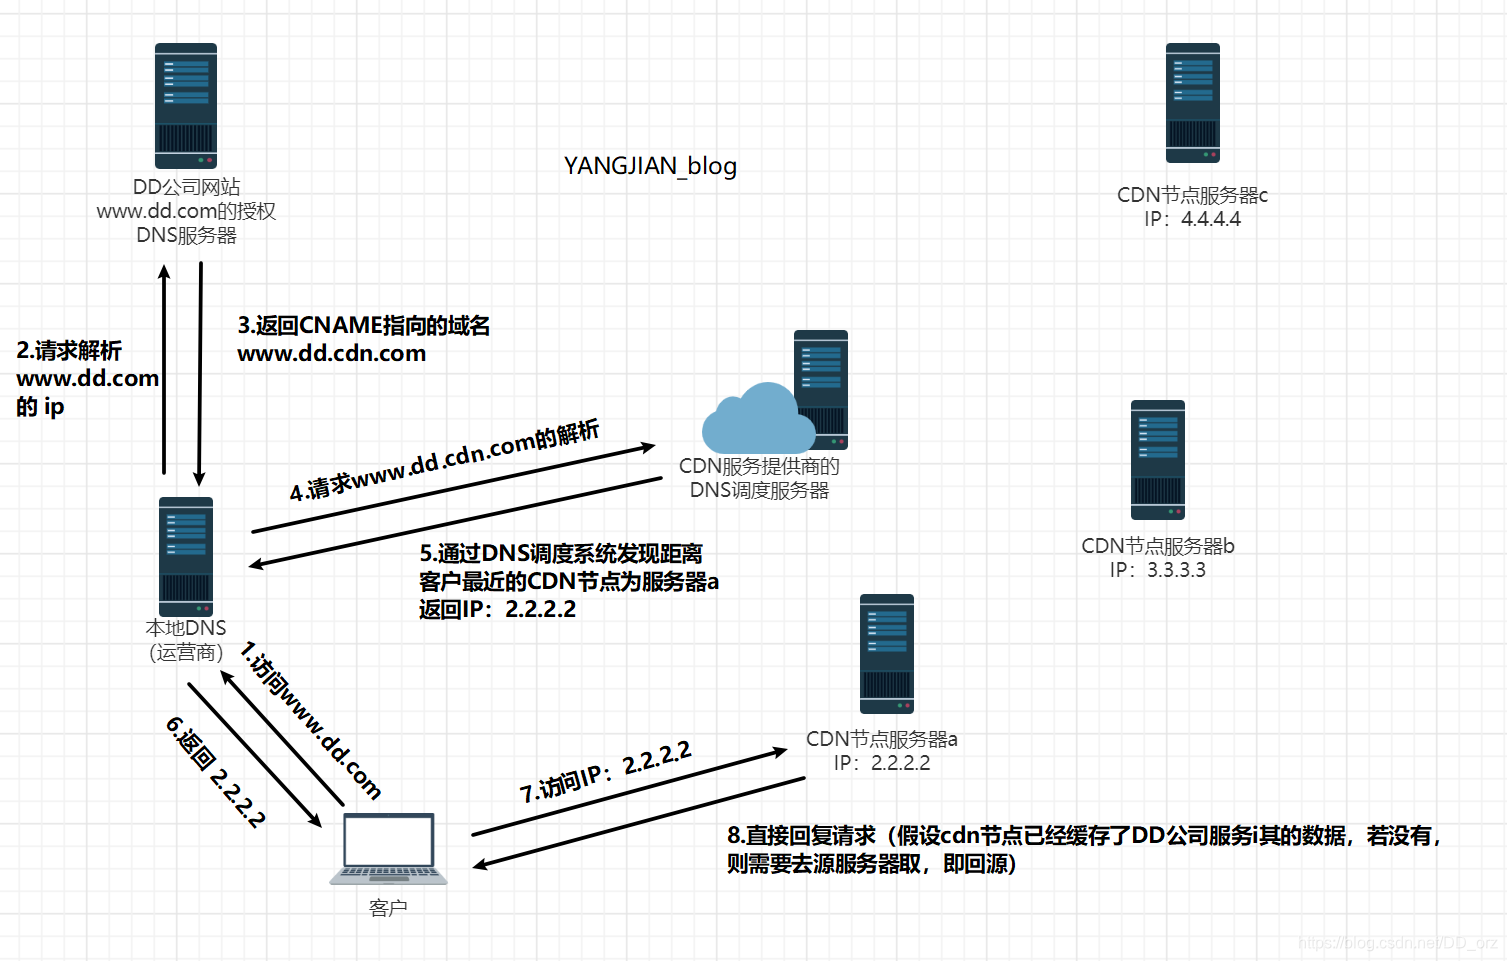
假如你是DD公司老板,你公司中的一台IP为1.1.1.1的服务器,注册了域名为www.dd.com,要对外提供客户访问。随着公司越做越大,访问量也越来越多,服务器顶不住了,你去找CDN提供商购买CDN加速服务,这个时候他们要求你的域名做个CNAME指向他们给你的一个域名叫www.dd.cdn.com

www.dd.comwww.dd.cdn.com

当用户访问www.dd.com的时候,本地DNS会获得CDN提供的CNAME域名:www.dd.cdn.com,然后再次向DNS调度系统发出请求,通过DNS调度系统的智能解析,把离客户端地理位置最近的(或者相对负载低的,主要看CDN那边智能解析的策略)CDN提供商的服务器IP返回给本地DNS,然后再由本地DNS回给客户端,让用户就近取到想要的资源(如访问网站),大大降低了延迟。

图片


Credits

域名解析:https://www.cloudflare.com/learning/dns/what-is-dns/
CNAME别名记录:https://blog.csdn.net/DD_orz/article/details/100034049


问题:属性(Property)和访问器(Accessor)

如果在当前属性中直接添加自定义get和set访问器,在Unity引擎中访问/修改此属性时游戏会闪退。

1
2
3
4
5
6
7
8
9
public class TestClass : MonoBehaviour
{
public int TestProperty {
get { return TestProperty;}
set {
TestProperty = value;
}
}
}

解决方案

  1. 直接使用默认访问器
1
2
3
4
5
6
7
public class StartPage : MonoBehaviour
{
public int TestProperty {
get;
set;
}
}
  1. 创建一个新属性专门用于访问
1
2
3
4
5
6
7
8
9
10
11
public class StartPage : MonoBehaviour
{
private int testProperty;

public int TestProperty {
get { return testProperty;}
set {
testProperty = value;
}
}
}

问题:Start函数中使用不当loop循环

如果在start函数中使用while循环处理资源加载进度条,Unity引擎会在importing asset弹窗中卡死

1
2
3
4
5
6
7
8
9
10
11
12
13
14
15
16
17
18
19
20
21
22
23
public class TestClass : MonoBehaviour
{
[SerializeField] private Progressbar loadingBar;
[SerializeField] private AssetLabelReference gameImageAssets;

void Start() {
AsyncOperationHandle asyncHandle = Addressables.LoadAssetsAsync<Sprite>(gameImageAssets, _ => {});
asyncHandle.Completed += EnterGame;
StartCoroutine(GameLoadingCoroutine(asyncHandle));
}

private IEnumerator GameLoadingCoroutine(AsyncOperationHandle handle) {
// yield return Addressables.LoadAssetsAsync<Sprite>(gameImageAssets, _ => {});

while (!handle.IsDone && handle.PercentComplete < 1f)
loadingBar.SetProgressPercent(handle.PercentComplete);
}

private void EnterGame() {
// Disable Loading bar
// Enter gameplay
}
}

解决方案

使用协程(Coroutine)将while操作与Unity生命周期同步

1
2
3
4
5
6
7
8
9
10
11
12
13
14
15
16
17
18
19
20
21
22
23
24
25
26
27
public class TestClass : MonoBehaviour
{
[SerializeField] private Progressbar loadingBar;
[SerializeField] private AssetLabelReference gameImageAssets;

void Start() {
AsyncOperationHandle asyncHandle = Addressables.LoadAssetsAsync<Sprite>(gameImageAssets, _ => {});
StartCoroutine(GameLoadingCoroutine(asyncHandle));
}

private IEnumerator GameLoadingCoroutine(AsyncOperationHandle handle) {
while (!handle.IsDone && handle.PercentComplete < 1f) {
loadingBar.SetProgressPercent(handle.PercentComplete);
yield return null;
}

if (handle.Status == AsyncOperationStatus.Succeeded)
EnterGame();
else
Debug.LogError($"Failed to load game asset sprites: {handle.Status}");
}

private void EnterGame() {
// Disable Loading bar
// Enter gameplay
}
}

问题:在Awake/Start函数中修改GameObject位置

在Awake/Start函数中GameObject的position component尚未初始化完成,此时修改位置将不会起作用

1
2
3
4
5
6
private void Start() {
var newPos = transform.localPosition;
newPos.y += 100;

transform.localPosition = newPos;
}

解决方案

  1. 在Start函数中等待一帧后再修改位置,此时GameObject的position component可使用
1
2
3
4
5
6
7
8
private IEnumerator Start() {
yield return null;

var newPos = transform.localPosition;
newPos.y += 100;

transform.localPosition = newPos;
}
  1. 在Awake/Start函数之后的函数进行修改位置操作

问题:使用dotween移动layout group中的游戏对象会影响其他游戏对象

举例:一个老虎机有5个转轴Reel[] reels,移动reels[2]会将reels[0]和reels[1]的position清零


Socket vs Port

  • A TCP socket is an endpoint instance defined by an IP address and a port in the context of either a particular TCP connection or the listening state.
  • A port is a virtualisation identifier defining a service endpoint (as distinct from a service instance endpoint aka session identifier).
  • A TCP socket is not a connection, it is the endpoint of a specific connection.
  • There can be concurrent connections to a service endpoint, because a connection is identified by both its local and remote endpoints, allowing traffic to be routed to a specific service instance.
  • There can only be one listener socket for a given address/port combination.

Specifically, a TCP socket consists of five things:

  1. transport layer protocol,
  2. local address,
  3. local port,
  4. remote address,
  5. remote port

A port is a number between 1 and 65535 inclusive that signifies a logical gate in a device. Every connection between a client and server requires a unique socket.

For example:

  • 33123 is a port.
  • (localhost, 33123, 69.59.196.211, 80, TCP) is a socket.

Firefox (localhost:33123) <———–> stackoverflow.com (69.59.196.211:80)
Chrome (localhost:33124) <———–> stackoverflow.com (69.59.196.211:80)

When a client device accesses a website (such as Chrome sending HTTP requests), it automatically connects to port 80 on the web server to retrieve the requested content. When the web server receives the answer, it sends a response that has 80 as source port and 33123 as destination port.


Credits

网络编程与套接字:https://www.cnblogs.com/Sunbreaker/p/11318288.html


各层数据的组成形式

  • 数据单元(data unit)
    指许多信息单元。常用的数据单元有服务数据单元(SDU)、协议数据单元(PDU)。SDU是在同一机器上的两层之间传送信息。PDU是发送机器上每层的信息发送到接收机器上的相应层(同等层间交流用的)。

  • 分组/分片
    ip层的上层是传输层(tcp的头部为20Byte,udp头部字节是8Byte),ip层自己的头部需要占20字节,ip层的MTU = 1500 - 20 = 1480Byte, 超过1480Byte的数据,都需要被ip层分片,在达到目的前会自己重组

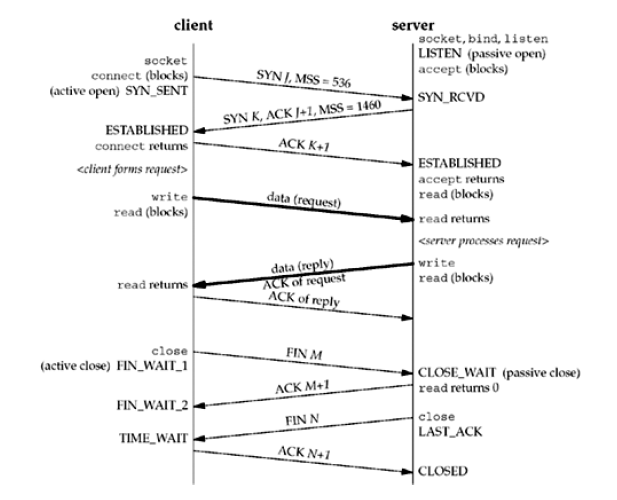
    • tcp是可靠传输协议,通过超时与重传机制,来保证收到的数据是完整的。因为tcp是可靠传输协议,如果要传输的数据大于 1480 - 20(tcp头部) =1460Byte时,在ip层被分片,而ip层分片会导致,如果其中的某一个分片丢失,因为tcp层不知道哪个ip数据片丢失,所以就需要重传整个数据段,这样就造成了很大空间和时间资源的浪费,为了解决这个问题,就有了tcp分组和MSS(最长报文大小)概念,利用tcp三次握手建立链接的过程,交互各自的MTU,然后用小的那个MTU-20-20 , 得到MSS,这样就避免在ip层被分片。
    • 由于udp是不可靠传输的,所以ip分片主要是为了upd服务的,所以就有了网上的 1500 - 20(ip头部) - 8(udp头部) > 1472Byte 的说法,把1472作为ip分片的标准
  • 报文(message) —— 应用层
    报文是网络中交换与传输的数据单元,也是网络传输的单元。报文包含了将要发送的完整的数据信息,其长短不需一致。报文在传输过程中会不断地封装成分组、包、帧来传输,封装的方式就是添加一些控制信息组成的首部,那些就是报文头。

  • 报文段(segment) —— 传输层
    组成报文的每个分组,将传输层分组称为报文段(面向连接(TCP)的数据传输)。报文段是起始点和目的地都是传输层的信息单元。

  • 数据报(datagram) —— 传输层
    面向无连接(Connectionless Communication)的数据传输,其工作过程类似于报文交换。采用数据报方式传输时,被传输的分组称为数据报。通常是指起始点和目的地都使用无连接网络服务的网络层的信息单元。(指IP数据报)

  • 数据包(packet) —— 网络层
    是网络层传输的数据单元,也成为“包”。包中带有足够寻址信息(IP地址),可独立地从源主机传输到目的主机。它的起始和目的地是网络层。

  • 帧(frame) —— 数据链路层
    帧是数据链路层的传输单元。它将上层传入的数据添加一个头部和尾部,组成了帧。它的起始点和目的点都是数据链路层。

  • 以太网帧

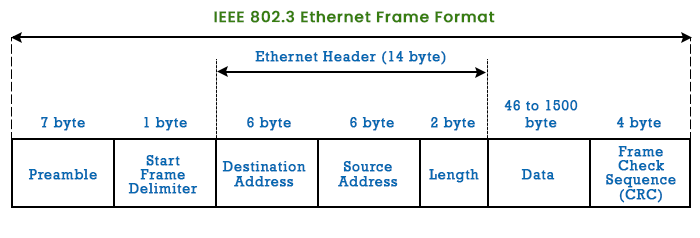
在以太网链路上的数据包称作以太帧。以太帧起始部分由前导码和帧开始符组成。后面紧跟着一个以太网报头,以MAC地址说明目的地址和源地址。帧的中部是该帧负载的包含其他协议报头的数据包(例如IP协议)。以太帧由一个32位冗余校验码结尾。它用于检验数据传输是否出现损坏。
在以太网帧中,Destination Address(目的地址)放在最前面。接收方收到一个以太网帧后,最先处理Destination Address字段。如果发现该帧不是发给自己的,后面的字段以及数据就不需要处理了。

什么是帧间距(IFG)

网络设备和组件在接收一个帧之后,需要一段短暂的时间来恢复并为接收下一帧.做准备互联网帧间隙共20字节,包括:

  • 以太网最小帧间隙 12Byte
  • 数据链路层帧 前导码 7Byte,用于时钟同步 This is a sequence of alternate 0s and 1s that denotes the beginning of the frame and enables bit synchronization between the sender and receiver.
  • 帧开始标识 1Byte (标识帧的开始)
  • 比特流(bitstream) —— 物理层

各层间数据传递

  • 不同的协议层对数据包有不同的称谓,在传输层叫做段(segment),在⽹络层叫做数据包 (datagram),在链路层叫做帧(frame)。
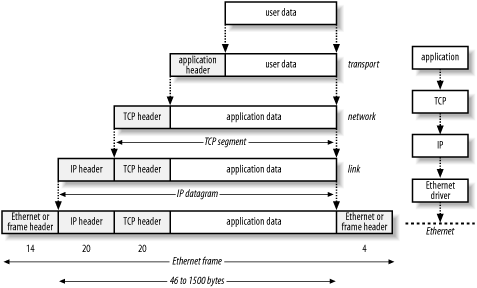
  • 应⽤层数据通过协议栈发到⽹络上时,每层协议都要加上⼀个数据⾸部(header),称为封装 (Encapsulation)。
  • ⾸部信息中包含了⼀些类似于⾸部有多⻓,载荷(payload)有多⻓,上层协议是什么等信息。
  • 数据封装成帧后发到传输介质上,到达⽬的主机后每层协议再剥掉相应的⾸部,根据⾸部中的 “上层协议字段” 将数据交给对应的上层协议处理。


数据的封装过程(从上至下)

传输层:报文被分为多个报文段,每个报文段上加上TCP首部(主要包含端口、源端口),变为TCP报文段;(注:TCP叫TCP报文段,UDP叫UDP数据报,也有人叫UDP段)
网络层:将TCP报文段加上IP数据包首部(主要包含目的IP,源IP),变成数据包;
数据链路层:将数据包加上目标MAC与源MAC、FCS(Frame Check Sequence)、变成MAC帧。
物理层:将帧变为比特流,传递给PC3物理层。


数据传输计量单位

Maximum Transmission Unit:最大传输单元,链路层的帧中的数据部分的最大字节数,以太网中的一般为1500字节。

Maximum Segment Size:TCP的报文段中的数据部分的最大字节数,MTU减去IPv4的Header和TCP的Header。IPv4的Header和TCP的Header一般都是20字节,则 1500-20-20 = 1460字节。

Maximum Segment Lifetime:报文最大生存时间。报文在网络上存在的最长时间,超过这个时间报文将被丢弃。当TCP执行一个主动关闭,并发回最后一个ACK,该连接必须在TIME_WAIT状态停留的时间为2倍的MSL。这样可让TCP再次发送最后的ACK以防这个ACK丢失(另一端超时并重发最后的FIN)。存在这个规则导致一个后果就是在这个2MSL的时间内,该地址上的链接(客户端地址、端口和服务器端的地址、端口)不能被使用。比如我们在建立一个链接后关闭链接然后迅速重启链接,那么就会出现端口不可用的情况。

Round Trip Time:往返时延。在计算机网络中它是一个重要的性能指标,表示从发送端发送数据结束,到发送端收到来自接收端的确认数据总共经历的时延。RTT=传播时延(往返哒)+ 排队时延(路由器和交换机的)+ 数据处理时延(应用程序的)。

Time To Live:IP头部有一个TTL域,TTL是time to live的缩写,中文可以译为“生存时间”,这个生存时间是由源主机设置初始值,但不是具体的时间,而是存储了一个IP数据报可以经过的最大路由数,每经过一个路由器此值就减1,当此值为0则数据报将被丢弃,同时发送ICMP报文通知源主机。


Credits

数据包:https://blog.csdn.net/a3192048/article/details/84671340


TCP/IP网络模型各层协议功能

1. 应用层

应用层是网络通信的最高层,它定义了应用程序和网络之间的接口。在这一层,用户可以直接与应用程序进行交互。常见的应用层协议有HTTP、FTP、SMTP等。

  • Proxy
    A proxy server (forward proxy) takes requests from a client and forwards them to the internet, a reverse proxy takes requests from the internet and forwards them to a server.

  • Transport Layer Security
    SSL/TLS uses asymmetric encryption is used to establish a secure session between a client and a server, and symmetric encryption is used to exchange data within the secured session.
    密钥:数据的加密是通过密钥进行的,通过密钥,明文被加密成密文。密钥分为对称加密密钥和非对称加密密钥。密钥为一段随机生成的数,通常以 .pem或者 .key文件保存,可以使用Openssl生成。
    对称加密:加密解密都是使用同一个密钥。服务器使用该密钥进行加密,经过传输后客户端使用该密钥解密。该方式效率高,但存在安全隐患。
    非对称加密:非对称加密具有一个密钥对,公钥和私钥,理论上来说公钥和私钥并不区分,便于区分将保存在本地的那个叫做私钥,将需要传输给对方的那个叫做公钥。数据经过私钥加密后,只能由对应的公钥解密,同样数据经过公钥加密后,只能由对应的私钥解密。那么只要客户端拥有服务器的公钥,通过公钥加密报文,服务器用自己的私钥解密就可以实现对传输过程的加密。非对称加密的效率比较低,而且仍有被中间人攻击的风险。
    证书颁发机构:CA机构是权威的第三方,机构本身具有自己的CA公钥与CA私钥,CA公钥是发给全体互联网成员的,可以将其称为CA证书。服务器需要将自己的 公钥以及认证信息经过HASH加密后发改CA机构,CA机构使用CA私钥对提交的信息进行加密,这就得到了带有数字签名的数据。在使用时使用CA公钥对带有数字签名的数据解密,得到经HASH后的数据,同时将公钥以及认证信息 经过HASH加密后与CA解密后的数据比对,验证电子签名的安全性。

2. 传输层

传输层负责在源主机和目标主机(端到端)之间建立数据传输通道,主要协议有TCP和UDP。

3. 网络层

网络层负责在网络上寻址和路由数据包。它定义了数据在网络中的传输路径,使得数据可以从源主机传输到目标主机。常见的网络层协议有IP协议。

  • 地址解析协议
    ARP(Address Resolution Protocol,地址解析协议)是用来将IP地址解析为MAC地址的协议。主机或三层网络设备上会维护一张ARP表,用于存储IP地址和MAC地址的映射关系

4. 数据链路层

数据链路层协议负责将网络层传输的数据分组封装成帧,传输到物理层,并通过物理介质进行传输。常见的数据链路层协议有以太网和Wi-Fi等。

5. 物理层

物理层是网络通信的最底层,它负责在物理介质上传输比特流。它定义了物理连接的特性,如电压、频率等。常见的物理层介质有光纤、双绞线等。


二层设备和三层设备

二层设备是工作数据链路层的设备。二层交换机可以识别数据包中的MAC地址信息,根据MAC地址进行转发,并将这些MAC地址与对应的端口记录在自己内部的一个地址表中。具体的工作流程如下:
(1) 当交换机从某个端口收到一个数据包,它先读取包头中的源MAC地址,这样它就知道源MAC地址的机器是连在哪个端口上的;
(2) 再去读取包头中的目的MAC地址,并在地址表中查找相应的端口;
(3) 如表中有与这目的MAC地址对应的端口,把数据包直接复制到这端口上;
(4) 如表中找不到相应的端口则把数据包广播到所有端口上,当目的机器对源机器回应时,交换机又可以学习一目的MAC地址与哪个端口对应,在下次传送数据时就不再需要对所有端口进行广播了。
不断的循环这个过程,对于全网的MAC地址信息都可以学习到,二层交换机就是这样建立和维护它自己的地址表。

三层设备是工作在网络层的设备。路由器是最常用的三层设备,利用不同网络的ID号(即IP地址)来确定数据转发的地址。IP地址是在软件中实现的,描述的是设备所在的网络,有时这些第三层的地址也称为协议地址或者网络地址。


Credits

详解TCP/IP五层网络模型:https://blog.csdn.net/2201_75437633/article/details/137373813
TLS/SSL:https://blog.csdn.net/weixin_44640149/article/details/134667685


Stack vs. Heap

In C#, primitive types such as int, double, and bool are all structs. Arrays of int are allocated on heap as int structs, only pointer to them will be allocated on stack.
To make a fixed size array be stored on stack, you need to use the stackalloc keyword, either with unsafe block or Span type.

unsafe关键词示例
1
2
3
4
public void unsafe foo(int length)
{
int* bar = stackalloc int [length];
}
type Span示例
1
2
3
4
public void foo(int length)
{
Span<int> bar = stackalloc int [length];
}

unsafe

unsafe关键字用于声明不安全的代码块。在C#中,默认情况下,代码是安全的,这意味着它遵循.NET的安全规则,包括对内存的访问控制。使用unsafe关键字可以告诉编译器,你了解并信任这段代码,即使它可能违反安全规则。

使用unsafe关键字需要满足一些条件:

  1. 你的项目必须被标记为允许不安全代码(通过在项目的属性中设置Allow Unsafe Code)。
  2. 你的代码必须在unsafe代码块中。
  3. 你必须使用fixed关键字来固定内存块。

fixed

fixed 关键字在 C# 中主要用于固定内存地址,通常与不安全代码(unsafe)一起使用。当你在不安全的代码中直接访问内存时,使用 fixed 关键字可以确保内存地址在程序运行期间保持不变。

使用 fixed 关键字的主要原因是:在垃圾回收过程中,垃圾回收器可能会移动内存中的对象。如果一个指针指向一个对象,而该对象在垃圾回收过程中被移动,那么该指针就会变得无效。通过使用 fixed 关键字,你可以告诉垃圾回收器不要移动这个对象,从而确保指针始终指向有效的内存地址。

fixed关键字示例
1
2
3
4
5
6
7
8
9
10
11
12
13
14
unsafe class Example  
{
int[] array = new int[10];
fixed int* ptr = stackalloc int[] { 1, 2, 3 };

void Method()
{
int* p = ptr; // 这里的p指向一个固定的内存地址
for (int i = 0; i < array.Length; i++)
{
*(p + i) = array[i]; // 将数组的值赋给固定的内存地址
}
}
}

在这个例子中,我们创建了一个固定大小的数组 ptr,并在方法 Method 中使用它来修改另一个数组 array 的值。因为 ptr 是用 fixed 关键字声明的,所以它指向的内存地址在 Method 执行期间是固定的,不会发生位移

checked

checked关键字用于在算术运算中控制溢出检查。默认情况下,当一个整数运算结果超出了该类型的表示范围时,会抛出System.OverflowException异常。使用checked关键字可以强制执行溢出检查,并在发生溢出时抛出异常。

checked关键字示例
1
2
3
4
5
6
7
8
9
10
11
12
13
14
15
16
17
18
19
20
21
22
23
24
25
26
27
28
29
30
31
class Program  
{
static unsafe void Main(string[] args)
{
int maxValue = int.MaxValue;
int* ptr = stackalloc int[] { maxValue }; // 创建一个固定大小的数组
fixed (int* p = ptr) // 使用fixed关键字固定内存地址
{
*(p + 1) = 0; // 尝试访问超出数组范围的内存,这会导致未定义的行为(除非使用unsafe代码)
}
Console.WriteLine(ptr[1]); // 这将输出0,因为我们在不安全的代码中修改了内存
}
}
uint a = uint.MaxValue;

unchecked
{
Console.WriteLine(a + 3); // output: 2
}

try
{
checked
{
Console.WriteLine(a + 3);
}
}
catch (OverflowException e)
{
Console.WriteLine(e.Message); // output: Arithmetic operation resulted in an overflow.
}

输出:
2
Arithmetic operation resulted in an overflow.

如果没有checked,那么输出的就是2,不会抛出异常也不会提示结果实际上已经超出范围了。导致程序发生一些不可预估的问题;

在这个例子中,我们创建了一个固定大小的数组,并在一个fixed代码块中修改了数组外的内存。因为我们使用了unsafe和fixed关键字,所以这是合法的。但请注意,试图访问数组外的内存是一种未定义的行为,可能会导致程序崩溃或其他不可预测的结果。


Credits

https://blog.csdn.net/qq_31418645/article/details/135245645


显示器类别

根据显示技术和用途的不同,显示器可以分为多种类型,主要包括:

  • 阴极射线管显示器(CRT)
  • 液晶显示器(LCD)
  • 发光二极管显示器(LED)
  • 等离子显示器(PDP)
  • 有机发光二极管显示器(OLED)
  • 量子点显示器(QLED)

VSync 工作原理

What is VSync? VSync stands for Vertical Synchronization. The basic idea is that synchronizes your FPS with your monitor’s refresh rate. The purpose is to eliminate something called “tearing”. I will describe all these things here.

Every CRT monitor has a refresh rate. It’s specified in Hz (Hertz, cycles per second). It is the number of times the monitor updates the display per second. Different monitors support different refresh rates at different resolutions. They range from 60Hz at the low end up to 100Hz and higher. Note that this isn’t your FPS as your games report it. If your monitor is set at a specific refresh rate, it always updates the screen at that rate, even if nothing on it is changing. On an LCD, things work differently. Pixels on an LCD stay lit until they are told to change; they don’t have to be refreshed. However, because of how VGA (and DVI) works, the LCD must still poll the video card at a certain rate for new frames. This is why LCD’s still have a “refresh rate” even though they don’t actually have to refresh.

I think everyone here understands FPS. It’s how many frames the video card can draw per second. Higher is obviously better. However, during a fast paced game, your FPS rarely stays the same all the time. It moves around as the complexity of the image the video card has to draw changes based on what you are seeing. This is where tearing comes in.

Tearing is a phenomenon that gives a disjointed image. The idea is as if you took a photograph of something, then rotated your vew maybe just 1 degree to the left and took a photograph of that, then cut the two pictures in half and taped the top half of one to the bottom half of the other. The images would be similar but there would be a notable difference in the top half from the bottom half. This is what is called tearing on a visual display. It doesn’t always have to be cut right in the middle. It can be near the top or the bottom and the separation point can actually move up or down the screen, or seem to jump back and forth between two points.

Why does this happen? Lets take a specific example. Let’s say your monitor is set to a refresh rate of 75Hz. You’re playing your favorite game and you’re getting 100FPS right now. That means that the mointor is updating itself 75 times per second, but the video card is updating the display 100 times per second, that’s 33% faster than the mointor. So that means in the time between screen updates, the video card has drawn one frame and a third of another one. That third of the next frame will overwrite the top third of the previous frame and then get drawn on the screen. The video card then finishes the last 2 thirds of that frame, and renders the next 2 thirds of the next frame and then the screen updates again. As you can see this would cause this tearing effect as 2 out of every 3 times the screen updates, either the top third or bottom third is disjointed from the rest of the display. This won’t really be noticeable if what is on the screen isn’t changing much, but if you’re looking around quickly or what not this effect will be very apparant.

Now this is where the common misconception comes in. Some people think that the solution to this problem is to simply create an FPS cap equal to the refresh rate. So long as the video card doesn’t go faster than 75 FPS, everything is fine, right? Wrong.

Before I explain why, let me talk about double-buffering. Double-buffering is a technique that mitigates the tearing problem somewhat, but not entirely. Basically you have a frame buffer and a back buffer. Whenever the monitor grabs a frame to refresh with, it pulls it from the frame buffer. The video card draws new frames in the back buffer, then copies it to the frame buffer when it’s done. However the copy operation still takes time, so if the monitor refreshes in the middle of the copy operation, it will still have a torn image.

VSync solves this problem by creating a rule that says the back buffer can’t copy to the frame buffer until right after the monitor refreshes. With a framerate higher than the refresh rate, this is fine. The back buffer is filled with a frame, the system waits, and after the refresh, the back buffer is copied to the frame buffer and a new frame is drawn in the back buffer, effectively capping your framerate at the refresh rate.

That’s all well and good, but now let’s look at a different example. Let’s say you’re playing the sequel to your favorite game, which has better graphics. You’re at 75Hz refresh rate still, but now you’re only getting 50FPS, 33% slower than the refresh rate. That means every time the monitor updates the screen, the video card draws 2/3 of the next frame. So lets track how this works. The monitor just refreshed, and frame 1 is copied into the frame buffer. 2/3 of frame 2 gets drawn in the back buffer, and the monitor refreshes again. It grabs frame 1 from the frame buffer for the first time. Now the video card finishes the last third of frame 2, but it has to wait, because it can’t update until right after a refresh. The monitor refreshes, grabbing frame 1 the second time, and frame 2 is put in the frame buffer. The video card draws 2/3 of frame 3 in the back buffer, and a refresh happens, grabbing frame 2 for the first time. The last third of frame 3 is draw, and again we must wait for the refresh, and when it happens, frame 2 is grabbed for the second time, and frame 3 is copied in. We went through 4 refresh cycles but only 2 frames were drawn. At a refresh rate of 75Hz, that means we’ll see 37.5FPS. That’s noticeably less than 50FPS which the video card is capable of. This happens because the video card is forced to waste time after finishing a frame in the back buffer as it can’t copy it out and it has nowhere else to draw frames.

Essentially this means that with double-buffered VSync, the framerate can only be equal to a discrete set of values equal to Refresh / N where N is some positive integer. That means if you’re talking about 60Hz refresh rate, the only framerates you can get are 60, 30, 20, 15, 12, 10, etc etc. You can see the big gap between 60 and 30 there. Any framerate between 60 and 30 your video card would normally put out would get dropped to 30.

Now maybe you can see why people loathe it. Let’s go back to the original example. You’re playing your favorite game at 75Hz refresh and 100FPS. You turn VSync on, and the game limits you to 75FPS. No problem, right? Fixed the tearing issue, it looks better. You get to an area that’s particularly graphically intensive, an area that would drop your FPS down to about 60 without VSync. Now your card cannot do the 75FPS it was doing before, and since VSync is on, it has to do the next highest one on the list, which is 37.5FPS. So now your game which was running at 75FPS just halved it’s framerate to 37.5 instantly. Whether or not you find 37.5FPS smooth doesn’t change the fact that the framerate just cut in half suddenly, which you would notice. This is what people hate about it.

If you’re playing a game that has a framerate that routinely stays above your refresh rate, then VSync will generally be a good thing. However if it’s a game that moves above and below it, then VSync can become annoying. Even worse, if the game plays at an FPS that is just below the refresh rate (say you get 65FPS most of the time on a refresh rate of 75Hz), the video card will have to settle for putting out much less FPS than it could (37.5FPS in that instance). This second example is where the percieved drop in performance comes in. It looks like VSync just killed your framerate. It did, technically, but it isn’t because it’s a graphically intensive operation. It’s simply the way it works.

All hope is not lost however. There is a technique called triple-buffering that solves this VSync problem. Lets go back to our 50FPS, 75Hz example. Frame 1 is in the frame buffer, and 2/3 of frame 2 are drawn in the back buffer. The refresh happens and frame 1 is grabbed for the first time. The last third of frame 2 are drawn in the back buffer, and the first third of frame 3 is drawn in the second back buffer (hence the term triple-buffering). The refresh happens, frame 1 is grabbed for the second time, and frame 2 is copied into the frame buffer and the first part of frame 3 into the back buffer. The last 2/3 of frame 3 are drawn in the back buffer, the refresh happens, frame 2 is grabbed for the first time, and frame 3 is copied to the frame buffer. The process starts over. This time we still got 2 frames, but in only 3 refresh cycles. That’s 2/3 of the refresh rate, which is 50FPS, exactly what we would have gotten without it. Triple-buffering essentially gives the video card someplace to keep doing work while it waits to transfer the back buffer to the frame buffer, so it doesn’t have to waste time. Unfortunately, triple-buffering isn’t available in every game, and in fact it isn’t too common. It also can cost a little performance to utilize, as it requires extra VRAM for the buffers, and time spent copying all of them around. However, triple-buffered VSync really is the key to the best experience as you eliminate tearing without the downsides of normal VSync (unless you consider the fact that your FPS is capped a downside… which is silly because you can’t see an FPS higher than your refresh anyway).

I hope this was informative, and will help people understand the intracacies of VSync (and hopefully curb the “VSync, yes or no?” debates!). Generally, if triple buffering isn’t available, you have to decide whether the discrete framerate limitations of VSync and the issues that can cause are worth the visual improvement of the elimination of tearing. It’s a personal preference, and it’s entirely up to you.


Credits

VSync explanation: https://hardforum.com/threads/how-vsync-works-and-why-people-loathe-it.928593/

CRT显示器和各类显示器比较:https://blog.csdn.net/m0_69378371/article/details/145129033

其次函数:输入函数扩大 a 倍,其响应函数相应的也扩大 a 倍。

Unity中的齐次坐标是一种在计算机图形学中常用的表示坐标的方式,通过引入一个额外的维度来扩展传统的笛卡尔坐标系,以便进行几何变换和矩阵运算。‌齐次坐标将n维的向量或矩阵用n+1维来表示,这样可以明确区分向量和点,并且能够方便地处理平移变换‌。

齐次坐标通过增加一个额外的分量w来实现。当w≠0时,可以将齐次坐标转化为普通的笛卡尔坐标;当w=0时,表示一个无穷远的点‌。这种表示方法使得4x4矩阵(仿射矩阵)能够同时进行线性变换和平移变换,而3x3矩阵(线性矩阵)则只能进行旋转和缩放等线性变换‌。

在Unity中,齐次坐标主要用于顶点着色器和片段着色器中,进行模型的变换、投影和视图转换等操作。通过使用齐次坐标,可以统一处理各种变换,使得着色器的实现更加统一和高效‌


一、单一设计原则(Single Responsibility Principle,SRP)

定义:
一个类应该只有一个引起变化的原因,或者说一个类应该只有一个责任。

关键思想:

  1. 一个类应该专注于一种类型的任务,只有一个责任;
  2. 一个类应该只有一个原因引起它变化。

二、里氏替换原则(Liskov Substitution Principle,LSP)

定义:
任何基类可以出现的地方,其子类一定可以出现,而程序仍然能够保持正确性。换句话说,子类应该能够替代其基类而不引起程序错误。

关键思想:

  1. 子类型必须能够替代基类型,而程序的行为不会发生变化。
  2. 子类型应该继承基类型的行为,并且能够按照期望使用。

三、迪米特原则(Law of Demeter,LoD)

迪米特原则也被称为最少知识原则(Principle of Least Knowledge,PLK)或者直接调用原则(Least Knowledge for Law of Demeter,LKP),是面向对象设计中的一个原则,其核心思想是降低类之间的耦合度,减少对象之间的相互依赖。

定义:
一个对象应该对其他对象保持最少的了解。具体来说,一个类不应该直接调用其他类的内部方法,而是通过它自己的方法或者通过传递给它的对象来完成某项操作

关键点:

  1. 一个对象应该对其他对象有最少的了解。
  2. 类与类之间应该尽量减少耦合。
  3. 不要直接访问其他对象的内部成员,而应该通过该对象提供的公共方法来进行间接访问。

四、依赖倒置原则(Dependency Inversion Principle,DIP)

定义:
高层模块不应该依赖于低层模块,两者都应该依赖于抽象。

抽象不应该依赖于细节,细节应该依赖于抽象。

这意味着在设计系统时,应该避免高层次模块(比如模块的业务逻辑)依赖于低层次模块(比如数据库操作或具体实现类),而应该依赖于抽象,即接口或抽象类。这样可以使系统更加灵活,易于扩展和维护。

关键点:

  1. 高层次的模块(例如业务逻辑)不应该依赖于低层次的模块(例如具体实现),两者都应该依赖于抽象(接口或抽象类)。
  2. 抽象不应该依赖于具体的实现,具体的实现应该依赖于抽象。

五、接口隔离原则(Interface Segregation Principle,ISP)

定义:
接口隔离原则是面向对象设计中的一条原则,它强调一个类不应该强制依赖它不使用的接口。具体来说,一个类对其他类的依赖关系应该建立在最小的接口集上。

关键点:

  1. 一个类不应该被迫依赖它不使用的接口。
  2. 客户端不应该被迫依赖它不使用的方法。

这两点意味着接口设计应该精简,只包含客户端需要的方法,避免将不相关的方法强行放在同一个接口中。


六、开闭原则(Open/Closed Principle,OCP)

定义:
开闭原则是面向对象设计中的一个基本原则,它由勃兰特·梅耶(Bertrand Meyer)提出,并由罗伯特·C·马丁(Robert C. Martin)进一步发扬光大。该原则的定义是:

软件实体(类、模块、函数等)应该对扩展开放,对修改关闭。

这意味着一个软件实体可以通过扩展来应对新的行为需求,而不需要修改已有的代码。这可以通过抽象和接口实现,以确保对于新增功能的引入,不需要修改现有的代码,而是通过扩展来实现。

关键点:

  1. 对扩展开放: 新的功能应该通过新增代码而不是修改已有代码的方式引入。
  2. 对修改关闭: 已有的代码在引入新的功能时不应该被修改,以确保稳定性。

Credits

六大设计原则举例说明:https://blog.csdn.net/qq_45165610/article/details/136027921